Tuesday, September 29, 2009

Introduction to Physical Computing - 3rd Class

Topics covered during class:
  • Question and answer session related to week’s assignment
  • Concepts and components related to electricity
Q&A from last week’s assignment
The only part of this week's Q&A that I have captured here is a conversation regarding how to create a fluid experience when using analog input to control an action. Many of us in the class have realized that often when using analog sensors we are forced to deal with a lot of noise. So ultimately the question is “how do we reduce the noise to improve the interaction?”

To solve this problem, Tom recommends that we set-up a way to track the change in state that an analog sensor undergoes and use this difference to activate an action, rather than activating actions based on the absolute state of the sensor alone. This paradigm is used in several more advanced examples on the Physical Computing syllabus (this is just a general link to the syllabus as I have not looked for the specific examples yet). Some of the state change detection examples focus on digital input; however, the principle can be easily adapted for with analog inputs.

Back to Basics of Electricity
Resistors: Though we have discussed resistors several times in the past, we briefly reviewed a few important attributes before delving into new concepts: (a) Resistance – its ability to resist the flow of electricity (b) heat dissipation – its ability to convert electrical energy into heat, thus consuming voltage (aka potential); and (c) Impedance – its ability to resist changes in voltage.

Capacitors: Components that are able to store energy when it is available, or spikes. Then they are able to release the stored energy when it is no longer available. Most capacitors can work with electricity flowing in either direction, except for polarized ones that work better in one direction. Capacitors can usually hold energy for long time, though they are not able to hold much energy.

When do we use capacitors? Capacitors are often used like surge protectors to help stabilize energy since they collect charge when the charge spikes, and release it when it is low. Because of their impact on electric waves they also influence other waves such as sound – we will explore the consequences of this fact in future lectures.

Voltage Regulators: Most plugs have voltages that vary considerably above or below the recorded voltage. Voltage regulators are designed to minimize these spikes and keep voltage supply steady. All regulators have a minimum voltage/electricity requirement, if this minimum is not met then the regulator will not be able to output any voltage. Regulators are able to dissipate voltage by converting it to heat. This is why these components heat up when used for a long period of time (you will notice this if you touch a regulator that has been on for a while, then after burning yourself you will not make this same mistake again).

You should always use the lowest possible resistor for a given task because this is the most efficient solution (no need to use a 16v DC adaptor and resistor for 5v power delivery, if you have a 9v resistor available).

Parallel vs. serial circuits: There is an important distinction regarding how voltage and current flows through parallel and serial circuits. When two components are in parallel they divide the current but receive the same voltage. However, when two components are in serial order they divide the voltage while receiving the same current.

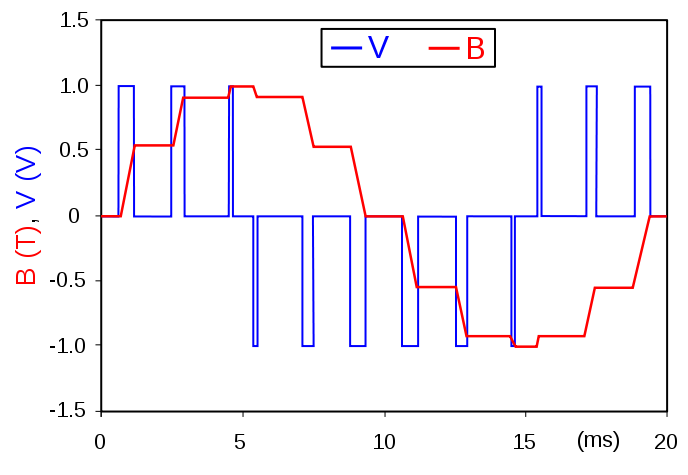
Pulse Width Modulation (PWM): PWM refers to the way in which microcontrollers, such as the Arduino, are able to emulate analog output via digital pins. This process entails sending electric currents that alternate between on and off in varying intervals to match the appropriate analog output level. Here is a link to a more in-depth description from wikipedia (image below taken from wikipedia post on this topic).

It is important to note that PWM needs to be calibrated based on the component that it is being used to control. For example, if we attach a motor to a PWM output then we need to calibrate the output setting to take into consideration the amount of time required to activate the motor.

Working with Complex Circuits: When creating complex circuits analyze each sub-circuit individually before trying to understand the overall circuit. Understanding the sub-circuits will enable you to understand the larger circuit that they create together.

Measuring Electricity Lab

Last Friday I completed this week's lab for Physical Computing. The objective of our assignment was to familiarize ourselves with how to use a multimeter to measure voltage, current, and continuity.

To prepare for this lab I set-up the breadboard so that it could be connected directly to a power source. This required that I set-up a voltage regulator to convert the 15v generated from the AC/DC converter to 5v. This was actually the hardest part of the lab for me because at first I was using another component that looked just like the voltage regulator. After almost burning my finger on the over-heated component (and enlarging a few of the wholes in my breadboard), I was able to get the breadboard set-up properly.

The video below captures the various voltage and current measurements that I executed. As expected, when we measured voltage the values across different components in the circuit always added up close to the full 5v. From a current perspective, we were able to verify that current is consistent throughout a circuit except in areas where there is a parallel circuit (in these instances the current is divided between the parallel components/paths).

Monday, September 28, 2009

Arduino Tic Tac Toe

This weekend I spend some time building a simple game of tic tac toe using an Arduino and a variety of simple components, both analog and digital. Here is a video that takes you through the process of creating this game. Below you will find the code that I used to program the Arduino. I have left all comments in the code so that you understand how it is built. I am sure there are many ways that this code can be improved and/or streamlined.


Tic Tac Toe Code
// setting a variable to pin number 13
int tictacPins [] = {2,3,4,5,6,7,8,9,10,11};     // holds pin location of each LED (including the active user one at 0)
int userPin = 0;                                 // holds the location on the array where the active user is displayed
int winnerPin = 13;                               // holds the location on the array wher the winnerPin is located
int buttonPin = 12;                              // holds number of pin for button input
int potPin = 0;                                  // holds number of pin for the potentionmeter

int potRead = 0;                                 // holds the pot value
int potRange = 0;                                // holds the value of the pot range to go from one LED to the next
int activeUser = 1;                              // holds the active user (1 or 0)
boolean buttonState = false;                     // holds buttonState (true means it has been pressed)
int user2counter = 0;                            // holds variable to enable the active user LED to blink
int blinkStateUser2 = 1;                         // holds the current blink state for all player two LEDs
int blinnkStateSelect = 0;

long unsigned timeButton;                        // holds time variable that ensures only one button press is read at a time
long unsigned timeButtonInter = 500;             // holds the interval between button presses
long unsigned timeUserLED;                       // holds time variable that governs blinking of the LED light that is currently active (prior to being selected)
long unsigned timeUserInter = 150;               // holds the interval for the blinking of the LED lights described above
long unsigned timePlayerLED;                     // holds time variable that governs the blinking of the LED lights on the spots that were selected by player 2
long unsigned timePlayerInter = 1200;            // holds the interval for the blinking of the LED lights described above
long unsigned timeHolder;

int tempActiveLoc = 1;                           // holds number of active locations on board           
int activeLoc = 1;                               // holds current LED selected 
int availableLoc = 9;                            // holds number of available locations
boolean locState [] = {true, false, false, false, false, false, false, false, false, false};              // holds current state of each location board - true = taken; false = available
boolean user1select [] = {false, false, false, false, false, false, false, false, false, false};          // holds current state of board for player 1 - true = taken by player 1; false = not taken by player 1
boolean user2select [] = {false, false, false, false, false, false, false, false, false, false};          // holds current state of board for player 2 - true = taken by player 2; false = not taken by player 2
boolean gameStatus = true;                       // holds whether game is active or over
int gameWinner = 0;


// set-up the output pin where LED will be attached

void setup()   {           
  for (int counter = 0; counter <= 9;  counter++) {                  // counter to set pinMode for all tic tact toe board pins (and active user pin)
    pinMode(tictacPins[counter], OUTPUT);                            // setting each pin as output
  } 
  pinMode(winnerPin, OUTPUT);                                        // set win notification pin as output
  pinMode(buttonPin, INPUT);                                         // set button switch as input
  resetGame();                                                       // call reset game function to initialize the game
}

// the loop() method runs continuously
void loop()                     
{
  setAvailableLoc();                                         
  blinkCounters();
  setUser();
  browsePin();
  setButtonState();
  selectPin();
  displaySelect();
  displayUserStatus();
  displayGame();
  checkWin();
} 

// function that reads if the button has been pressed. Then it sets buttonState to true if button was pressed
void setButtonState() {
  if (millis() - timeButton > timeButtonInter) {
    if (digitalRead(buttonPin) == HIGH) {                                               // if the button is pressed
        buttonState = true;                                                             // set buttonState to true
        timeButton = millis();                                                          // record that time when button was pressed
    }
  }
}

// function to set counter for player 2 pins to blink properly

// function that changes the active user if button has been pressed (e.g. player has made a selection
// function also calls setUser2PinState function to set counter for blinking player 2 lights
void setUser() {
    if (buttonState == true && activeUser == 1) {      // if button has been pressed and active user is 0    
        activeUser = 2;                                // set active user to 1
        buttonState = false;                           // set button state to false 
      }
    else if (buttonState == true && activeUser == 2) { // if button has been pressed and active user is 1     
        activeUser = 1;                                // set active user to 0
        buttonState = false;                           // set button state to false
    }
}

// function regulates the blinking of the user status pin based on what user is currently active
void displayUserStatus () {
  if (gameWinner == 0) {                                 // confirm that no one has won the game
    displayPin(userPin, activeUser);                     // calls displayPin function with to change state of userPin to currect active user
  } else {
    if (gameWinner == 1) {                              // check if user 1 won
      displayPin(userPin, 1);                           // calls displayPin function to show the winner if user 1
    } else if (gameWinner == 2) {                       // check is user 2 won
      displayPin(userPin, 2);                           // calls displayPin function to show the winner ifuser 2
    }
  }
}

// function that governs the activity of each selected pin based on whether it is a user 1 or user 2 pin
void displayPin (int tempPin, int tempUser) {
  if (tempUser == 1) {                                     // checks if current user is user 1 (0)
    digitalWrite(tictacPins[tempPin], HIGH);               // if it is user 1 then turn on the pin pin 
  } else if (tempUser == 2) { 
    if (blinkStateUser2 == 1) {                            // checks if current user is user 2 (1)
      digitalWrite(tictacPins[tempPin], HIGH);             // turn on the pin
    }  
    if (blinkStateUser2 == 2) {                            // check counter number if equal to one
      digitalWrite(tictacPins[tempPin], LOW);              // turn off the pin
    }
  }
}

// counter function that governs the blinking of all user 2 lights
void blinkCounters () {   
    if (millis() - timePlayerLED < timePlayerInter/2) {                    // checks if enough time has elapsed sine light was turned on
       blinkStateUser2 = 1;                                                // keeps the light on until the time has exceed a given interval
     }  else if (millis() - timePlayerLED > timePlayerInter/2) {           // once interval has passed
       blinkStateUser2 = 2;                                                // set light off by change blink state to two
     }       
    if (millis() - timePlayerLED > timePlayerInter) {                      // once a full cycle has passed of turning the light on and off
      timePlayerLED = millis();                                            // reset the time tracker for the next loop
    }
}

// function that displays the game
void displayGame () {
    if (gameWinner == 1 || gameWinner == 2) {                            // if the game has been won be either player
      digitalWrite(winnerPin, HIGH);                                     // turn on green LED
      displayPin(userPin, gameWinner);                                   // display the winner's blink pattern on user LED
    } else {                                                             // if the game has not been won
      digitalWrite(winnerPin, LOW);                                      // keep green LED off
    }     
    for (int counter = 1; counter <= 9; counter++) {                     // loop through each location on the tic tac toe board
      if (locState[counter] == true) {                                   // if location has been selected/taken
        if (user1select[counter] == true) {                              // check if player one has taken this location
           displayPin(counter, 1);                                       // turn on LED to denote space taken by player 1
        } else if (user2select[counter] == true) {                       // check if player 2 has taken this location
          displayPin(counter, 2);                                        // blink LED to denote space taken by player 2
        }
      }
    }
}

// function that re-initialized the game once someone has won
void resetGame() {
  potRead = 0;                                         // holds the pot value
  potRange = 0;                                        // holds the value of the pot range to go from one LED to the next
  activeUser = 1;                                      // holds the active user (1 or 0)
  buttonState = false;                                 // holds buttonState (true means it has been pressed)
  user2counter = 0;                                    // holds variable to enable the active user LED to blink
  tempActiveLoc = 1;                                   // holds number of active locations on board           
  activeLoc = 1;                                       // holds current LED selected 
  availableLoc = 9;                                    // holds number of available locations
  gameStatus = true;                                   // holds whether game is active or over
  gameWinner = 0;
  timeButton = millis();
  timeUserLED = millis();
  timePlayerLED = millis();
  for (int counter = 1; counter <= 9; counter++) {                // loop to set all initialize all arrays and turn off all LEDs on tic tact toe board
     locState [counter] = false;                                  // reset locState array
     user1select [counter] = false;                               // reset user 1 location array
     user2select [counter] = false;                               // reset user 2 location array
     digitalWrite(tictacPins [counter], LOW);                     // turn off all LEDs on tic tac toe board
     
  }
  
}


// function that makes the current selected pin blink on and off
void displaySelect() {  
  if (availableLoc != 0 && gameWinner == 0) {                        // if there is a space available on the tic tac toe board and no winner
    if ((millis() - timeUserLED) > (timeUserInter)) {                // if sufficient has passed since the beggining of the last cycle
      digitalWrite(tictacPins[activeLoc], HIGH);                     // turn on the selected LED
      delay (150);                                                   // wait for 150 milliseconds
      digitalWrite(tictacPins[activeLoc], LOW);                      // turn off the LED lights
      timeUserLED = millis();                                        // reset cycle start time
      }
  }
}


// function that reads the potentiometer and uses this information to select a pin
void browsePin () {
  int openLoc = 0;                                            // variable that holds how many open locations have been found in the array

  potRead = analogRead(potPin);                               // read the potentionmeter
  tempActiveLoc = map (potRead, 0, 1024, 1, availableLoc+1);  // set the size of the range
  
  for (int counter = 1; counter <= 9; counter++) {            // loop to identify current pin based on number of available pins and range 
    if(locState[counter] == false) {                          // if the pin has not been selected yet 
     openLoc++;                                               // then add 1 to openLoc
    }
    if (openLoc == tempActiveLoc) {                           // if openLoc is equal to tempActiveLoc
      activeLoc = counter;                                    // then make activeLoc equal to counter 
      openLoc++;
   }  
  }
}
  
// identifies the number of available locations on the board
int setAvailableLoc () {
  availableLoc = 0;                                          // initialize the availableLoc to 0
  for (int counter = 1; counter <= 9 ; counter++) {          // loop from 1 to 9
    if (locState[counter] == false) {                        // if the location is set to false (e.g. not yet selected)
       availableLoc = availableLoc + 1;                      // add one to the availableLoc variable 
    }
  }
}

// function that enables a user to select a pin
void selectPin () {
  if (gameWinner == 0) {                                      // check if the game has been won, if it has not then
    if (buttonState == true && activeUser == 1) {             // if the button has been pressed and the active user is 1
      locState[activeLoc] = true;                             // set the current location to taken
      user1select[activeLoc] = true;                          // register the location as selected by user 1
    } else if (buttonState == true && activeUser == 2) {      // if the button has been pressed and the active user is 2
      locState[activeLoc] = true;                             // set the current location to taken
      user2select[activeLoc] = true;                          // register the location as selected by user 2
    } 
  } else if (gameWinner == 1 || gameWinner == 2) {            // if game has been won
      if (buttonState == true) {                              // and if button has been pressed
        resetGame();                                          // reset the game
      }
  }
}

// function that confirms whether either player has won the game
void checkWin() {
  
  // check to see if player one won
  if ((user1select[1] == true) && (user1select[2] == true) && (user1select[3] == true)) {
        gameWinner = 1;
  } else if ((user1select[1] == true) && (user1select[4] == true) && (user1select[7] == true)) {
        gameWinner = 1;
  } else if ((user1select[1] == true) && (user1select[5] == true) && (user1select[9] == true)) { 
        gameWinner = 1;
  } else if ((user1select[2] == true) && (user1select[5] == true) && (user1select[8] == true)) {
        gameWinner = 1;
  } else if ((user1select[9] == true) && (user1select[3] == true) && (user1select[6] == true)) {
        gameWinner = 1;
  } else if ((user1select[9] == true) && (user1select[7] == true) && (user1select[8] == true)) {
        gameWinner = 1;
  } else if ((user1select[7] == true) && (user1select[5] == true) && (user1select[3] == true)) {
        gameWinner = 1;
  } else if ((user1select[4] == true) && (user1select[5] == true) && (user1select[6] == true)) {
        gameWinner = 1;
  } 

  // check to see if player two won
  if ((user2select[1] == true) && (user2select[2] == true) && (user2select[3] == true)) {
        gameWinner = 2;
  } else if ((user2select[1] == true) && (user2select[4] == true) && (user2select[7] == true)) {
        gameWinner = 2;
  } else if ((user2select[1] == true) && (user2select[5] == true) && (user2select[9] == true)) { 
        gameWinner = 2;
  } else if ((user2select[2] == true) && (user2select[5] == true) && (user2select[8] == true)) {
        gameWinner = 2;
  } else if ((user2select[9] == true) && (user2select[3] == true) && (user2select[6] == true)) {
        gameWinner = 2;
  } else if ((user2select[9] == true) && (user2select[7] == true) && (user2select[8] == true)) {
        gameWinner = 2;
  } else if ((user2select[7] == true) && (user2select[5] == true) && (user2select[3] == true)) {
        gameWinner = 2;
  } else if ((user2select[4] == true) && (user2select[5] == true) && (user2select[6] == true)) {
        gameWinner = 2;
  } 

}
 

Thoughts on The Machine Stops by E.M. Forster

I thoroughly enjoyed the short story The Machine Stops, by E.M. Forster. This tale tells the story about a future world where everyone lives a life secluded in private cells, all communications are mediated through a machine, all human needs are satisfied through this same machine, and first-hand experience of anything and everything is frowned down upon. Similar to the world depicted in Orwell's classic 1984, humans in this world live like slaves though most choose not to recognize this reality.

The main sentiment Forster echoes in this short story is the fear that through technology we may loose our humanity (or in other word, technology may ultimately dehumanize our society). In The Machine Stops, the machine, rather than man, has become the measure for all things. Human beings have been relegated to lives without any direct contact with nature or one another. Original thought and experience are looked down upon, since they are not confined to the conventions upon which the machine is built.

Before I delve any further into Forster's story, it is important for me to define what I think he means by technology. In one of my classes at ITP someone posited that we (as in humans) considered technology to be anything that was developed after we passed our early teenage years. Though this explanation is practical when talking to a younger person about devices such as computers and cellphones, it is not nearly broad enough. Technology ultimately refers to the making of things - that is why written language is a technology and so is religion, democracy, the wheel, man-made fire, books, bicycles, and of course iPhones.

One very interesting, and prescient element, about this story is how humans choose to imprison themselves by this machine of their own making. This contrasts with many more modern sci-fi stories - e.g. terminator and the matrix - where the machines gain consciousness and rise up against humans. This idea of humans choosing to imprison themselves is fascinating, especially when you view the many layers of technology through which we already mediate our experience of the world.

It brings to my mind how even the technology of language, especially when complemented by writing, often functions as lens through which humans experience the world rather than a set of tools to describe our experiences. As pointed out in Ong's reading from last week, the birth of written language gave rise to much fear (as has the rise of computers in our modern age). In the end it was ironic how the people who were best able to verbalize their fearful emotions about the new technology of written language, embraced written language in their attempts to make cases against it.

The many conventions that we have created in language and that govern our experience of the world were mostly developed in response to one person's (or many people's) experience from a long time ago. The problem is that these conventions often remain in place long after the context in which they were created has vanished. Worst yet, these conventions are often held as truths that supersede a person's conflicting direct experience of the world.

In the world created by Forster, technology is in many ways a dead relic from the past that keeps us from experiencing directly the world in which we are living right now. In his book Zen and the Art of Motorcycle Maintenance, Robert M. Pirsig offers another interesting perspective on technology, and our discontents with it: the source of our discontent with technology in Western society is caused by the dualistic thought that dominates our society. "The way to solve the conflict between human values and technological needs is not to run away from technology. That's impossible. The way to resolve the conflict is to break down the barriers of dualistic thought that prevent a real understanding of what technology is-a fusion of nature and the human spirit into a new kind of creation that transcends both." (p. 284).

As such, the problem with the technological progress in Western society, and the feeling of estrangement caused by it, could be ascribed to our focus on rational and considerations and subject-object dualism (the machine-side of man) and disregard for emotional considerations and a holistic understandings, which cannot be verified analytically.

Thursday, September 24, 2009

Introduction to Computational Media - 2nd Class

Topics covered during our 2nd class:
  • Review homework and share learnings
  • Example or processing sketches for inspiration
  • Code basics and learning to make things move
Review homework and share learnings

We kicked off class by reviewing the homework from the first week. Here is an overview of the processing functions and tools were used by other people, and which I want to remember for my own applications/uses:
  • comments – there are two ways to add comments to your sketch:
// one line comments start with “//”
/* multiple line comments are bracketed by “*/” */
  • strokeWeight(weight) – sets the weight of the stroke on a line. Accepts one argument that is int or float input.
  • strokeCap(cap type) – change the style of line caps; options include SQUARE, ROUND, and PROJECT.
  • shape() – allows creation of shapes by joining lines and curves together. Accepts up to five arguments – shape datatype, x-coordinate, y-coordinate, width, and height.
  • vertex() and curveVertex() – draw straight and curved lines as part of a shape. There are many arguments that can be accepted by these functions, and they work slightly different so check out the reference for details.
  • colorMode() – allows changing range of each color argument. The default setting is a range of 255 for each color argument.
Made with Processing

To provide inspiration and help the class understand the potential of Processing, we reviewed many cool applications developed with this toolset. Here are a few of the sites that we visited during class:
Code Structure

Software is structured to be able to run forever. Therefore, it is helpful to think about software in two useful and distinct parts:

The first part defines what needs to happen at the beginning. This covers to the activities that take place in the set-up section, or block, of the sketch. This section of the code only runs once during the execution of a program.

setup() {
set-up code
}

The second part focus on describing what needs to happen continuously. In processing this is the draw section, often referred to as a loop section (as in the Arduino IDE). This block of code gets executed repeatedly as long as the application is running. This is the area of the sketch where you will add code to animate your creation.

draw () {
drawing code
}

Making Things Move

One of the easiest ways of making things move is using the mouseX and mouseY variables. These two variables track the location of the mouse on a screen at any given moment. With little coding you can make a shape follow the mouse around the screen.

To make things move in processing it is important to understand the concept of double buffering, as this is the process by which the screen is rendered. This means that processing first renders the screen in RAM, then once it is fully rendered it outputs the results on the display. Therefore, each time the draw function loops the display is only refreshed once.

Variables are crucial elements of programming language and refer to data storage units that are user-defined (except for a few useful system variables such as mouseX and mousey, discussed above). There are three steps involved in using a variable:
  • Declare the variable. This is when you define the type of variable and give it a name. Common variable types include int (integer or whole number), float (decimal number), Boolean (logical value), strings (text) and arrays (groups of variables). Variables can be defined globally or locally – local variables are only available within the function in which they are defined.
  • Initialize the variable. This refers to when we assign a value to the variable. Variable initialization can happen in many places depending on the use and scope of the variable. When possible it is good practice to initialize global variables in the set-up function. That said, global variables can also be initialized where they are declared.
  • Use the variable: There is no point to creating a variable if you are not going to use it. Now you can write the code that leverages the variable for your own purposes.
Conditionals are very important tools for adding movement and interactivity into a sketch. These functions enable the application to choose between alternate actions according to parameters that you define. They are always based on Boolean expressions, which are logical expressions that resolve to either true of false. Based on these logical expressions a block of code is either be executed or not. Note that it is usually good practice to separate the code written for logic and that written for drawing to screen (this is not always possible though).

When you start adding complexity to your sketch it is important to learn how to use debugging tools and strategies as these will save much hair pulling and potentially worse behavior. println() is one such function that enables the program to output information in the processing IDE (on the screen below the sketch code). The information visible through println() is only visible to the programmer.

Assignments

Start introducing some types of variables into your work so that it can be animated in some way. I have already done this assignment, here is a link to my blog post about it.

Miscellaneous
  • Tiny sketch competition going on from Rhizome. Build app with 200 characters or less. Check it out. Available on http://openprocessing.org website.
  • Class next semester about modeling natural systems and physics in processing. Talk to Dan about this class.
  • For data visualization books and examples built with processing look at Ben Fry’s data visualization books as a starting point.

Fangs is Back - Assignment for 2nd Week of ICM

For the second week of ICM we were tasked with creating a sketch that animates by leveraging conditional and loop statements, together with variables. I took this a few steps further by incorporating arrays, functions, objects, and (and even a photosensor computing sensor).

Though I had no experience writing software using an object oriented language, I had a theoretical understanding of this type of structure. In high school (longer ago then I care to remember), I wrote a paper about the principles of object oriented programming (OOP). This was during my senior year. I was happy to finally truly understand the power of this type of programming.

The latest version of the fangs sketch has the following features: a bat pointer follows the mouse around the screen. When that mouse button is pressed new bats are created. The right and left arrow keys enable the user to rotate the bats in either direction (though this feature is still not working perfectly). The eyes of the bats move around so that they are always looking towards the center. Finally, I created a sleep mode were all the bats perch themselves at the top of the window. The up and down buttons enable the user to enter and exit the sleep mode.


I encountered a lot of challenges when working on this project.

To be able to replicate the bats I defined a bat class that encapsulate all the attributes and behavior of the bat. Then I wrote code that creates individual instances of bats that are dynamically added to an array of bats (so that they can be easily managed). The bat class includes many methods/functions, including ones that randomly move the bat or move bat according to specific coordinates, that rotate bats in either direction, that transition bats into sleep mode, and that display all the bats.

To rotate the bats I had to learn how to use the pop/pushMatrix, translation, and rotation functions. This was one of the hardest obstacles I faced during the development of this sketch. However, once I learned how to use these capabilities I rewrote a lot of the code so that I could use them for all bat movements within my sketch (originally I considered using to pull of the rotation only).

The last tough challenge I had to overcome was associated to the sleep mode. Getting the bats to rotate properly and stop at the right location and rotation took some work. Originally I had planned to create only two states to govern this transition (sleep, awake), however, I realized that I need to create a third state (launch) so that the bats could properly rotate back to being right side up. I also had to find a solution to make the bats eyes closed once they had reached the top.

Check out my code on the openprocessing website. Let me know if you have any questions.

Wednesday, September 23, 2009

30 Minute Film Festival & 42 Seconds

Here is the one minute short video that I created with Patricia, Lisa, and Eric for Comm Lab. Our challenge was to make movie from ideation through final cut in 30 minutes (ok maybe it was more like 40 minutes). Here is the fruit of our labor:


We had a great time putting this movie together, not to say that we didn't feel any stress as that was a key part of the challenge. Our process started with an open brainstorm session that focused on creating a list of individual words. Once we captured 40 words we reviewed them to pick out a few words or themes with which to build a story. This is what made it to the top of the list: car, racing, accident, hurt, 42 seconds.

Through conversation and negotiation we quickly reached an agreement on the overall storyline and began making a list of shots we needed. We then sprinted downstairs to shoot the footage. Then raced back upstairs to edit the movie. We were done just in the nick of time.

Analog Input Lab

Yesterday I set-up an analog input on the Arduino for the first time. I am happy to report that I did not encounter any major issues. The only roadblock was my own carelessness which caused me to initially connect the cables incorrectly.

The video below includes highlights from my set-up of a potentiometer and a photosensor. In both cases I used the analog switch to control the brightness of the LED light attached to the board.

The Memory Machine

The Memory Machine is a device that continuosly records locations, sights, sounds and smells. It then stores this information for a period of 72 hours.

The Memory Machine is controlled via gestures and a portable control device. Users can also access information using an application on a desktop/laptop computer. All information is time- and location-coded to facilitate retrieval. Data captured in different media is linked.

To capture data the machine uses a camera, a microphone, an olfactory sensor (which does not currently exist, to my knowledge) and a portable control device. The slides below provide a rough overview of this fantastic machine (note that I did not include the olfactory sensor in this sketch).

Tuesday, September 22, 2009

My New York From La Guardia to George Washington

After hiding from the sun for 15 minutes in a small sliver of shade, I boarded the M5 bus on the corner of Houston and La Guardia. It is 16:08 on a beautiful and sunny Saturday afternoon. This is an ideal day to transform a ride on an MTA bus into a scenic tour of my beloved and adopted hometown, New York.

During the 15 minutes before the bus arrived I had a frantic dialogue with my iPhone to curate the playlist that will serve as the soundtrack for this journey. I have always explored this city with a soundtrack. This addiction started when I first moved to New York and was working as a DJ. During this time I became compulsive about always leaving home with my portable music player and the latest draft of my demo.

I board the bus, pay the fare and find a forward-facing seat on the left side of the aisle. I set the playlist to shuffle and press play as the bus pushes away from the curb, synchronizing the start of the first track with our departure. The soundtrack starts with the song Heartbeat, which is an energetic vocal house track by the British band the Knife. I switch my focus back to the outside world and my assignment.

Over the previous couple of days I had given much thought to this assignment: What perspective did I want to take? What tools did I need to bring? I decided that my piece would be personal, that a soundtrack would enhance the experience, and that I needed a way to capture my thoughts. The iPhone took care of items two and three while I was left with the tougher challenge of defining writing a personal account of the tour. This is what was going through my mind as the tour began.

As we reach the corner of Houston and Sullivan I notice a small Italian shop called Rafetto’s . I used to frequent this store when I lived on Thompson Street . It is one of the few businesses that have survived from the days when this little corner of SOHO was primarily a simple Italian neighborhood. More recently, the Italian businesses left in the neighborhood are mostly high-end brand shops from brands such as Dolce & Gabbana, and Prada.

We turn onto 6th Avenue and head north past one of my favorite Italian restaurants, Bellavitae , which is located on Mineta Lane off 6th. A few blocks north we pass the famous Gray’s Papaya , where I’ve consumed many hot dogs. Next I spot the location of the old Balducci’s deli , where I used to savor delicious freshly-baked amaretto cookies.

My New York Memory Map

View Memories Houston to George Washington Bridge in a larger map

For many years I walked the stretch of pavement between Spring and 23rd Streets on a daily basis. This walk, coupled with a loud dose of electronic music, functioned as the caffeine fix that kick-started my days. This is why I would subject myself to this mode of transportation in the summer, fall, winter, and spring, rain, shine, or snow.

Despite the many good memories that I have from this area of the city, the visual landscape from the area between Houston to 17th street is not very appealing. It is dominated primarily by uninspired post-war developments populated by chain restaurant and retail brands, with some notable exceptions such as the Jefferson Market Library.

The architecture between 17th and 21st streets is a sharp contrast to the preceeding and following blocks. The buildings in this small enclave were originally constructed as luxurious department stores. Like much of New York, this area fell into a state of decay for several decades until being restored to its current well-maintained state during the last 15 years.

When we arrive at the corner of 20th street I examine my old office building . I notice that the Barnes & Nobles on the ground floor has closed. The storefront, which was once filled with a colorful selection of media and the recognizable faces of colleagues of mine on break, now looked like a dark and deserted void.

It was only 6 years ago that I stopped working here. I have many memories from eating and drinking at local restaurant and bars that have been replaced by new, and usually more upscale, establishments. This is a testament to the speed of urban renewal during the last decade in New York. In contrast, the presence of a few notable unoccupied retail spaces demonstrates the impact of the current economic crisis on the city’s ability to renew itself.

Once we cross 23rd street the buildings become less memorable and my personal stories and memories are less numerous. For many years I rarely crossed the 23rd street divide, which how this area came to be known amongst my friends.

The slice of 6th Avenue between 23rd and 34th is one of its least attractive parts. New cookie-cutter residential buildings dot this stretch, which is mostly lined with drab and grey post-war buildings. Aside from a few shinny new supermarkets and coffee houses, the commerce here is dominated by Indian clothing and jewelry wholesalers, and plants retailers.

As we approach the Manhattan Mall and Macy’s the crowd on the street swells exponentially. The weekend closure of Broadway above 34th has attracted a sea of people on this beautiful day. Looking at this spectacle I am reminded of my visit to Shibuya in Tokyo earlier this summer.

I look down at my iPhone to continue capturing my stream of consciousness and realize that I may run out of battery before the end of the trip. This realization leads me to think about my dependence on energy. I wonder how much energy it takes to keep this whole city “alive”, or even just one city block. The number is too high for me to even imagine. How long can we keep this up? What changes do I need to make in my life to help our society avoid a rude awakening?

I refocus on the world outside as we head into the garment district. Here the landscape changes to taller, though still mostly drab and grey, corporate-looking office towers. The commerce in this area is mostly fashion-related, as the name of neighborhood suggests. Bryan Park provides a breadth of fresh air in this boring midtown district. I worked just a few blocks away from this small oasis and enjoyed many lunch breaks sitting on one of its grassy patches.

Our arrival at Bryant Park is synched to the opening chords of the song My Beau, this is one of my favorite tracks from an LA-based artist called Daedelus. I feel like I am in that old VW Jetta commercial where the world around the car moves in synch to the beat of the music in the car.

We cross 42nd Street and the corporate office buildings quickly morph into imposing towers that exude a sense of power. This area through 55th street is a nucleus of banks, insurance companies, law offices, and multinational corporations. From the bus, the towers seem to be looking down at me with a hard and muscular stare. I feel very small in comparison; I enjoy the feeling.

When we reach 46th Street I begin to crave delicacies from a nearby Brazilian goods store called Buzios . This small shop, hidden on the second floor of a dilapidated building, is my favorite source for cooking supplies, cheeses, chocolates, and soft drinks from Brazil. On my first visits to New York in the nineties this strip of the city was overrun by Brazilian businesses. Now, Buzios is one of the few remaining Brazilian-owned businesses in this area that is still known as little Brazil.

At 55th street the row of towers comes to an end. A mix of residences, hotels and themed eating establishments line the few remaining blocks south of the park. I lived in this area during my first six months in New York, though I have spent little time here since I moved downtown.

While following along the southern edge of Central Park my view was limited to the south side of the street. The buildings lining this edge of the park are old luxury condominiums and hotels that are all in need of a good makeover. Especially when contrasted to the city’s newest and most luxurious shopping mall complex, which is located next door in Columbus Circle.

We reach Columbus Circle and take a right onto Broadway to cut diagonally across the island. The ten blocks above the Circle are home to many New York City treasures, including Lincoln Center and one of my favorite pizzas, at Fiorello’s . Broadway is lined with high-end residential complexes and big brand name stores. The buildings are less imposing and provide more visual breathing room than the power corridor we passed on upper 6th Ave.

We take a left and head towards the Hudson on an ugly stretch of 72nd street. When we reach Riverside drive I am struck by my view of the lush park and river. This is one of the few parts of the city that I had never visited; I can’t imagine a better day to acquaint myself with it. The song “Brother Love” from Animal Collective picks up slowly providing the perfect musical accompaniment.

The side of the street opposite the park is lined with beautiful upscale residential buildings. From 72nd through 120th there are strollers and kids parading down the sidewalk. This is by far the most family-friendly street on the tour. From my vantage point, the overall aura of the neighborhood makes me feel as though I have been transported to Brooklyn Heights.

After 60 blocks of river views the bus takes 135th Street over to Broadway for the final leg of our ascent to the George Washington Bridge. The contrast between Riverside Drive and this stretch of Broadway is severe. This section of Harlem is noticeably lower income than all of the other neighborhoods we visited along our route.

Most businesses in this area are locally owned with signage primarily in Spanish, with the exception of a few fast food restaurants and cell phone provider outposts. The sights, sounds and smells of the neighborhood are strongly Hispanic. The cash checking stores, phone card vendors, and abundance of Latin restaurants and grocery shops are part of the visible support structure for to this large community of immigrants.

When we reach 165th street and are in view of the George Washington Bridge we are forced to transfer buses. I take the opportunity to soak up some sun and I start to think about what I’ve witnessed so far. A new bus arrives within five minutes, and our tour ends only a few minutes thereafter when I step off the bus across the street from the GW Bridge.

On the subway ride back home, still listening to my soundtrack, I think about the diversity that exists within the 200 city blocks that I traveled today. I enjoyed the opportunity to consciously survey the physical manifestations of this diversity in the buildings and streets of the city. I also realize how the diverse cultures and values that were manifest in the streets outside the bus, were equally reflected in the bus riders themselves. This pattern of reflection reminds me how the unparalleled diversity offered by New York is one of main reasons I call this city my home.

The Tour Playlist


Monday, September 21, 2009

Visit to the Tree Museum in the Bronx

Earlier today I went to the Tree Museum in the Bronx with my wife. We took this trip because it is an assignment from my CommLab class, I was happy to go since I rarely get up to the Bronx. The museum was created by Irish artist Katie Holten to celebrate the communities and ecosystems along this historic boulevard. Visitors are able to listen to local stories related to the trees and their surroundings. These stories are offered by a wide-range of current and former residents.

We got off the subway at the stop on 161 St./Yankee Stadium and walked over to Joyce Kilmer and Franz Sigel Parks. The map bellow shows the area that we explored.


View Larger Map

Even though I did not find the stories themselves very enjoyable, the collaborative storytelling idea and the involvement of members from local community was compelling.

The format of the museum was what I found most interesting - it was powerful with potential for widespread use. Mobile phones are used as the delivery channel for this augmented reality experience. This easy and low-cost solution enables the addition of contextually relevant content to locations in the physical world and support interactive features such as commenting.

What was most fascinating is that the exhibits are ultimately the world around you - or at least a perspective on that small piece of the world. This simple technology seems ideal for small community and art guerrila groups that want to play around with the boundary between real and virtual worlds and the tagging of locations with different types of information.

The use of spoken media was ideal for this type of environment. Sound is the only option for communicating information while enabling an audience to appreciate their visual surroundings - this is not possible using text and image-based mobile internet. Mobile voice service is also a the most accessible portable technology, openning the museum to the widest possible audience. 

The experience was designed to be borderless and to allow each exhibit can live on its own. This makes it easy for individuals to customize their own experience. They can enter and exit the exhibition at any time either physically or mentally by walking away from the vicinity or shifting their focus away from the small markers that serve as the only physical manifestations of the museum.

Actually, one of the complaints I had about the design of the museum was that the markers were to small and non-descript. This made it hard to find the trees that were part of the exhibit. This, I'm sure (or at least suspect), is an area of a lot of debate during the development of such projects. To what point can or should the museum intrude in its real world surroundings considering that it is a visitor here (not the other way around)?

The last thought I have to share in regards to experiences of this type (at least for tonight) is: how can communal experience be delivered via these types of deconstructed museums and exhibits? How can other media provided via cell phone be used to help deliver on this communal experience angle? 

Sunday, September 20, 2009

Thoughts on Orality and Literacy - Chapters 1 - 4

I found the first four chapter of Walter Ong’s book Orality and Literacy fascinating. From my personal experience I agree with Ong’s premise that it in order to comprehend the role and impact of literacy we must understand pre-literate cultures. Furthermore, it is difficult for people from literate cultures (like myself) to understand the role that spoken language plays in oral cultures, and the strategies that pre-literate cultures use to support cognition and memory.

It is interesting to consider that writing is a technology that moved speech to a totally new sensory world, and as such it is still the biggest evolutionary leap in language that mankind has witnessed. It transformed language from a phenomenon that only existed in the “oral-aural” dimension to one that exists in the visual one as well.

When language is limited to the world of sound, a person’s experience of language is determined by its unique characteristics, including its short existence, and communal nature. This has many implications in the way people relate to language and the inner workings of their thought processes. Here are a few interesting examples:

Language is much more situated phenomenon in oral cultures that is closer to the “lifeworld” and is often considered to be magical. Spoken words go out of existence as soon as they are uttered. When language lives in the oral-aural sphere it is always part of an “existential” moment being uttered by a real living person to another person.

In literate languages words no longer hold such a close connection to the “lifeworld”. Words exist on their own in the pages of books, posters and other surfaces, regardless of whether they still hold any relevance. They have achieved the status of objects, or things, that are studied at a distance. This distance was crucial for the sharpening of our analytical and creative abilities.

For oral cultures language is always tied to an event or action in the real world. Their speech and thought patterns are less abstract, focusing on concepts that are relevant for immediate situational or operational needs. “Orality knows no lists or charts or figures.” For example, their relationship is not based on an abstract concept of being situated in a “computed time of any sort.”

Another interesting aspect of language in oral cultures is that it serves an important unifying function. Spoken language is communicated from at least one human being to another and can be used to address an audience of many people – regardless, physical proximity as a requirement.

On the other hand, written language requires the separation of the writer and reader. These two groups were always separated by time and space. The internet has provided new ways to mitigate this separation but in bringing us closer in a virtual world it is also taking us farther apart in the physical world. At this point in time the experience of instant video messaging still does not compare to talking face to face, but it is closer than ever before.

Ong’s description of how memory works in pre-literate cultures is intriguing. Culturally important information was maintained through story telling practices that leveraged “metrically tailored formulas” – poets were the main purveyors of the culture’s soul. These poets used this technology to create anew their stories every time they told them. And they told them over and over, enabling the creation of a communal memory.

Though the storyteller often considered himself capable of repeating the exact same story, research suggests that the story telling would differ each time it was told (though the story itself would remain largely consistent). Which points to the fact that “in functionally oral cultures the past is not felt as an itemized terrain, peppered with verifiable and disputed “facts” or bits of information…Remembered truth was…flexible and up to date.”

Thursday, September 17, 2009

Introduction to Physical Computing - 2nd Class

During today's class covered the following content:
  1. Reviewed basic concepts and questions related to last week's lab.
  2. Learned how to set-up analog inputs and outputs on the Arduino.
  3. Held a discussion about our reading on interactivity.
Review of basic concepts and lab questions
All of the circuits that we will build in this class are Direct Current, DC, circuits. In these types of circuits electricity only flows in one direction (as opposed to Alternating Circuits, DC). There are a few important concepts related to the quantity and power of electricity that run through these circuits. These concepts are closely all linked.
  1. Current [I] refers to the amount of electricity that flows through a point in a circuit within a specific window of time. Current remains consistent throughout a circuit regardless of the resistance of the conductive materials of the circuit. Measured in Amps.
  2. Voltage [V] refers to the electrical force or pressure that flows through a circuit. Voltage, often called "potential", is always used up in-full when it flows through a circuit. Resistors and other components are used to convert or dissipate electricity (as heat, light, etc). Measured in Volts;
  3. Power [P] refers to the power provided by the combination of current and voltage. In a DC circuit power is measured in Watts and it is equal to the voltage multiplied by the current (P = V x I).
  4. Resistance [R] refers to friction that is created by any given conductive material. Resistance causes voltage to dissipate, which is why voltage is lower on the side of a resistor nearest to ground. Measured in Ohms.
Ohm’s Law defines the relationship between voltage, resistance and power. It states that voltage is equal to the current multiplied by the resistance (V = I x R). This made sense to me when I began to think about it in the following manner: the amount of voltage, or potential, dissipated by a resistor is determined by the current and the resistance. If a strong current meets high resistance it will dissipate more voltage.

Specifications - All electrical objects have voltage and current specifications. When these specs are not respected short circuits and explosions are possible outcomes. This was demonstrated in class by connecting a 2v LED directly to the 5v power source on the Arduino, which caused the LED light to burn out. Resistors play a key role in solving these types of circuit issues.

Resistors - We are once again back to resistors. Since our last class I have gained a much better understanding regarding the role of these crucial components. Resistors are used to manage the flow of electrical energy throughout a circuit. They are responsible for ensuring that electricity flows through a circuit properly, and that voltage is dissipated to protect components from burn-out.

A resistor can be placed anywhere in a circuit. Using the LED example that I brought up earlier, to keep the LED from burning out we could have added a resistor between the LED and either the power source or ground. The main concern is ensuring that all voltage can be appropriately used up. Therefore, as long as there are enough resistors in the circuit to dissipate the additional voltage it does not matter where they are located relation to the LED.

If two resistors with the same resistance are added to a circuit then the voltage dissipated (or consumed) by each can be calculated by dividing the total voltage between those two resistors equally. If they have different resistance then the distribution of the consumption is proportional to the resistance of each resistors (for example if you have one 1K resistor and one 10K resistor then the voltage in the first resistor will be 1/11 of the total voltage while the second would feature 10/11 of the total voltage.

Each resistor is identified by 4 color bands. The first three bands determine the Ohm value. The final band refers to the margin of error associated with the resistor. Here is a link to two downloadable tools for identifying the Ohm value of resistor based on the color bands: resistulator and seafoid. Of course, a multimeter can also be used to identify a resistor.

Multimeter Primer
A multimeter can be used to check voltage, current, resistance and continuity. To measure voltage and current the multimeter needs to be set to the appropriate mode and range, and then connected to two points on a live circuit. If you don't know what range to select then start with the setting at the high end of the spectrum and move down until you get a positive reading.

To measure resistance the process is similar to that described above. The only difference is that the resistor needs to be removed from the circuit to be measured separately. On the other hand, to measure continuity the multimeter can be connected directly to a circuit or to a standalone component. The continuity mode is demarcated by an icon that looks like a dot with audio waves.

Interesting switch ideas:
  • Using liquids or gels as part of a switch: Tom shared a past project where he used two copper screens that served as a switch activated by drops of water.
Analog Inputs and Outputs
Analog inputs - The ability to handle and process analog input and output signals is crucial to enable the creation of interactions that are richer and more complex than is possible with digital alone. There are many different types of analog inputs, including:
  • Potentiometer
  • Thermistor
  • Photo sensor/resistor
  • Stretch sensor/resistor
  • Force sensor/resistor
  • Flexibility sensor/resistor
Most analog inputs work by alternating resistance in response to physical stimuli (the potentiometer is the exception here). Standard analog input circuits are comprised of two resistors: a base resistor and and a dynamic resistor (the sensor). As the dynamic resistor changes it impacts the voltage distribution throughout the circuit. The Analog Digital Converter (ADC) on the Arduino converts the voltage reading into a number between 0 (0v) and 1024 (5v). These numbers can now be used for processing. It is important to select and pair appropriate resistors because this will impact the quality and accuracy of the readings by the ADC. More on this after I get some hands-on knowledge regarding this topic.

Potentiometers (aka Pot) - a potentiometer is a special type of analog sensor that is essentially an electricity divider. It is made of graphite, which is a resistor, and features three pins. The first is connected to the electricity source, the second to an analog input pin, and the last to ground. The way it works is that the middle pin can move back and forward between the two outer pins. As it does so it alternates the resistance between itself and those pins.

Potentiometers are referred to by their overall resistance value. For example, a 10K pot will at any point in time exert 10K of resistance between the two sides of the analog input pin. This means that if one side has a resistance of 3K resistance, then the other side must have a resistance of 7K.

Coding Analog Input and Output
When using analog inputs it is not necessary to define the pinMode because the analog input pins are not multifunction like the digital ones. It is only necessary to define the analog input pin number using the AnalogRead() function, which is able to return a value between 0 and 1023.

Only pins marked PWM are able to function as analog outputs. These pins can output an analog value between 0 and 254, when used with the function AnalogWrite(). This function requires two arguments: the output pin number and output value.

Since the analog input and output ranges differ, it is important that we find strategies to leverage these functions together. The simplest way is to just divide the input value by 4. However, a more powerful alternative is to use the Map() function. This method enables the mapping of a number from one range to another range. It requires the following 5 arguments: number to map, low value of "from" range, high value of "from" range, low value of "to" range, high value of "to" range. It returns the value mapped to the new range.

One thing to consider when using this function is that if the number to map exceeds the low or high range defined in the arguments then the returned value jumps to the top or bottom of the output range accordingly.

Discussion about Interactivity
Interactive Art - Our conversation regarding interactivity focused mostly on discussions regarding our experiences with, and understanding of, interactive art. We were all in agreement that a participant's active role in interactive art is its main distinguishing factor. The participant brings to bear new perspectives that are not present in non-interactive works, where the artist has more complete control.

Attributes of people's experiences with interactive art:
  • Pure creation
  • Moving physically
  • Visceral
  • Access and control
  • Ephemeral
  • Challenges assumptions
Error Handling - We also had a brief discussion regarding the importance of being able to handle errors in ways that are consistent with the user experience your system was designed to deliver. This is a similar consideration to a performer needing to learn how to deal with problems that arise during their performance.

Assignment for Next Week
Fantasy Machine/Project: Create an idea for a fantasy machine. Bring this idea to life using sketches, written scenarios or videos. The idea does not have to be physically or technologically possible to create or prototype. Think through how a person would interact, or experience, this device. A short presentation will be due next week.

Wednesday, September 16, 2009

Comm Lab - 1st Class

Earlier this week we held our first Comm Lab class, led by Marianne Petit. Comm Lab is one of the foundational courses at ITP. If focuses on providing a theoretical introduction to, and hands on experience with, using a variety of tools for communication and story telling. In this class we will explore the use of blogging, social networks, comics, animations, sounds, video, imaging, and other media technologies. During this first session we reviewed the course syllabus and reviewing the process for setting up a WordPress blog.

The course is structured as follows: Mandatory weekly readings (reading list featured below) are coupled with class discussions to provide the theoretical underpinnings for the course. Collaborative and individual exercises are assigned on a weekly-basis to provide practical experience and know-how. Documentation of these explorations and readings is a key part of the course, serving as a foundation for developing strong skills and knowledge in this arena.

Required readings: Orality and Literacy by Walter Ong, Understanding Media by Marshall Mcluhan, Understanding Comics by Scott McCloud;

Recommended readings: Film Directing Shot by Shot by Steven Katz, Digital Foundations: Introduction to Media Design with the Adobe Creative Suite by Michael Mandiberg.

For this week our main assignment is to install the WordPress blog software on our partition of the ITP server. Here are the step by step directions for accomplishing this task. We are also tasked with reading the first four chapters from Walter Ong's book and posting a response on our newly set-up blogs. On a personal level, I am going to use this opportunity to test out the WordPress platform to determine whether I want to transfer all of my blogs from Blogger, where they currently reside.

Breadboard and Switches

Earlier this afternoon I finished setting up my first breadboard. After encountering many issues along the way I was thrilled to see the two LEDs on my breadboard alternate in response to my push of a button attached. Here is a video of my working circuit followed by a brief overview of the issues that I had to solve along the way.


The main issues that I encountered when setting up the breadboard were connecting to the arduino via the VCD port Driver for USB, and understanding how to use resistors properly. Here is how I overcame these challenges:

VCD Port Driver for USB Connectivity
Last night I attempted to hook up my Arduino to my computer at home. The Arduino program was not able to connected to the Arduino because it could not find the USB driver, even though I had used the same program to upload the blink program, as shown here. In order to solve this problem I had to re-install the Arduino program and USB driver more than once (make sure all USB ports are open when re-installing the software if you have the same problem).

Earlier today, when I hooked up the Arduino to my computer it was working once again. I am not sure what caused the failure but the reinstallations seem to have worked. Here is the full set of steps I took to get this working again:

  1. Disconnect all devices that are/should be using the FTDI driver
  2. Delete /System/Library/Extensions/FTDIUSBSerialDriver.kext
  3. Delete /System/Library/Extensions.kextcache
  4. Delete /System/Library/Caches/com.apple.kernelcaches/*
  5. Delete /Library/Receipts/FTDIUSBSerialDriver.pkg
  6. Delete /Library/Receipts/FTDIUSBSerialDriver.kext
  7. Un-install arduino software from your computer
  8. Re-install all software per the original directions from FTDI and Arduino
  9. Sleep (otherwise you'll make careless mistakes, as I did)

Using Resistors Properly
When I first got my breadboard hooked up earlier today the LEDs were lighting up weakly, as displayed on the video below. The source of this issue was that I had added the wrong resitor to the LED output pin. The resistors that I had originally used were too strong, that is why the LEDs did not receive sufficient energy.

Tuesday, September 15, 2009

Strolling for Sensors

On Monday morning I left my apartment with camera in hand to walk around my neighborhood to witness and, when possible, capture people's interactions with sensors. The trajectory of my walk was from my apartment to the post office; it is outlined on the Google map below.

Sensors (in the form of buttons, cameras, mics, etc) play a pervasive role in our modern lives; we are constantly interacting with them in intentional and unintentional ways. Here is an overview of all the sensors and interactions that I witnessed during this short stroll through the LES.

Sensor Walk Photos


List of devices and sensors encountered during the stroll:
  • Light Switch: on/off button
  • Elevator Call Button: call buttons and key lock
  • Fire Alarm Control: control buttons
  • Door Buzzer: apartment number buttons
  • Pay Phone: dial pad buttons and audio sensor
  • ATM Machine: number buttons and touchscreen sensors
  • Parking Meter: selection buttons
  • UPS Mobile Device: keyboard and touchscreen sensors
  • Portable Media Player: touchscreen sensors
  • Cell Phone: dial pad, audio, and photo sensors
  • Walkie Talkie Cell Phone: dial pad, audio sensor
  • Parked Car: proximity key sensor
  • Moving Car: steering wheel, buttons, and pedals
  • Post Office POS Device: touchscreen sensor
  • Door Open Button: large button
  • Satellite Dish: satellite
  • Video Camera: audio and photo sensors
  • Digital Camera: audio and photo sensors

Monday, September 14, 2009

Coding my First Sketch - Meet Little Fangs

Today I worked on my first Processing sketch, which is this week's lab for my Introduction to Computational Media class. The objective of this first assignment was to use the 2D shape library available in Processing to draw a creature. This creation will then be used in the comings weeks for our explorations with animation and interactivity.

I read the first two chapters of the class textbook to jog my memory. In the process of reviewing this material I came across a suggestion to use graph paper as a metaphor for understanding the way a computer displays information. This led me to use graph paper in the design of my creature, dubbed Little Fangs. Here is a scan of the graph paper that I used as a planning tool.

Planning for Little Fangs

As you can see, I used this paper and a trusty old pencil to map out the shapes that would construct Little Fangs. I found this process very helpful because it helped me breakdown my creation into discrete and code-able parts - I knew exactly how many shapes I needed to create, along with their approximate sizes before I even started coding. That said, once I transferred the sketch into code I still had to play around with the dimensions. So, without further delay let me introduce you to Little Fangs.


To access the code for this creature just follow the link above to my page on the Open Processing website. Also, if you are attempting a similar starter project I suggest using a book from Ed Emberley for inspiration. Ed creates drawing books for kids that feature a bunch of stuff that can be drawn with simple shapes.

Sunday, September 13, 2009

Quick Overview of The Laws of Simplicity

Conversations regarding the need to manage and reduce complexity have been taking place in the computer industry for a long time now. Computers enable complexity to grow exponentially. The practices of information architecture and interaction design were developed to address this issue and to enable people and organizations to use computation as an effective communication medium.

Now that computation technology has become a pervasive element of our professional and personal lives, the complexity related to managing exponentially growing volumes of information has spilled over into our day-to-day life experience. Simplicity is becoming crucial to the maintenance of our own sanity.

John Maeda's book about simplicity outlines a set of useful "laws" and "keys" to help individuals and organizations better understand how to leverage simplicity - in both personal and professional realms. In the spirit of the laws outlined in this book, I will keep my overview as short as possible.

Before I dive into the rules I wanted to share a quote from Muji that I found on the book's website (www.lawsofsimplicity.com). To me this quote encapsulates an interesting perspective on simplicity that is at the core of John's vision of simplicity: "Muji is simplicity - but simplicity achieved through a complexity of thought and design."

The 10 Laws of Simplicity
  1. Reduce - simplest way to achieve simplicity
  2. Organize - helps disguise many things into fewer entities
  3. Time - saving time feels like simplicity
  4. Learn - knowledge makes things simpler
  5. Differences - simplicity and complexity are like yin & yang
  6. Context - simplicity is highly context-dependent
  7. Emotion - emotions are important to deliver simplicity
  8. Trust - trust makes things simpler
  9. Failure - some things can't be made simpler
  10. The one - "Simplicity is about subtracting the obvious, and adding the meaningful."
The 3 Keys 
  1. Away - Moving elements far away makes more appear like less
  2. Open - Openness reduces complexity by bringing to bear the power of many
  3. Power - Use less, freedom from power is the only to provide simplicity 
That pretty much covers the main concepts from the book. Before wrapping up I also want to go over three acronyms developed to provide strategies for the implementation of the reduce, organize and learn laws. 
  • To reduce complexity once all elements that can be removed have been removed, the next steps to take are shrinking, then hiding, and lastly embodying (SHE). This last step refers to the process of embedding the simplified object with a sense of value.
  • To use organization to reduce complexity four steps are outlined: sort, label, integrate, prioritize (SLIP). I prefer to call the second step "group" rather than "label" so that it is not confused with the first step. That, however, does away with John's acronym.  
  • To transfer knowledge in order to reduce complexity there are five things to keep in mind: Basics - cover the basics, Repeat - repeat information often, Avoid - avoid causing desperation, Inspire - use examples to inspire, Never - don't forget to repeat (BRAIN)

Saturday, September 12, 2009

Setting up the Arduino - Let There Be Light

After several days of impatient waiting for the parts kit to come in I finally set up my Arduino a few minutes ago.

I read the tutorial on the Arduino website to get started. This helped me recall what we covered in class. I felt pretty confident during the entire process and all went off without a hitch. My first program was an interaction of the traditional "blink" sketch. The only deviation I made from the code that Tom showed us in class was that I set different delay times for the LEDs.

After confirming that the chipset was connected and working properly, and after having played around with the delays times I took the next logical step of adding an LED light to the Arduino. Never thought I could be so happy from being able to turn on a tiny little light. Here is an exciting video of the LED light on my Arduino blinking at different rhythms:

Friday, September 11, 2009

Translating a physical computing idea into manageable parts

Earlier today I read the first chapters of the Introduction to Physical Computing course textbook (Physical Computing: Sensing and Controlling the Physical World with Computers). In the introduction of this book I came across two interesting frameworks intended to help designers describe their idea and identify all distinct elements of the interaction that need to be solved.

The first framework focuses on helping designers break down their idea into bite-sized chunks. To complete this simple chart a designer must identify the input, output and processing requirements for their project. Pretty basic stuff that is often forgotten in moments of late-night, last minute panic.

Defining Your Physical Computing Challenges
Interesting note on selecting between digital and analog inputs and outputs: if an interaction can be described using words related to discreet states (e.g. "either" or "or") then a digital I/O solution will usually suffice; however, if the input or output can only be described with words related to intensity (e.g. "stronger", "brighter", etc.) then an analogue I/O device will likely be needed.
The second framework maps the level of complexity associated to different types of projects. This simple 4-cell illustrates that projects increase in complexity when they involve parallel and analog processing.

Mapping Complexity based on Serial and Parallel, Digital and Analog

Introduction to Computational Media - 1st Class

Today I attended my first Introduction to Computational Media class. The goal of this class is to teach us the practice of transforming an idea into algorithm and then translating that algorithm into code. The process of transforming an idea entails breaking down the concept into distinct parts (e.g. input, output, and processing elements) that can be coded using a programming language. For this course the programming language we will use is Processing, which is a flavor of Java.

The professor of my class is Daniel Shiffman. Daniel is extremely passionate about the art and science of using computation as a communication medium. He is very involved in the Processing community and has even written a textbook for beginners, like myself. I look forward to learning how to code under his guidance.

The course is structured to cover core concepts related to programming during the weekly classes; hands-on coding experience is provided via weekly assignments that are executed and documented. Though there is no formal requirement to keep a blog or journal I have decided to do so, for my own benefit. Mandatory readings will be provided from the book Learning Processing, we will also be required to complete exercises from this book.

During the first 4 weeks we will focus on the fundamental concepts of programming. These concepts can be divided into three main categories:
  • Data: variable, arrays
  • Control/Action: conditional, loop
  • Organization: functions, objects (cross all categories)

After week 4 we will build on our application development skills via on-going practice using additional functionality provided by the processing library and Java.

Here is a link to the full syllabus. Here are my notes from todays class:

About Programming Languages

Programming languages are classified as high-level and low-level languages.
  • Low-level languages are faster and often provide direct access to resources such as memory. C and C++ are examples of low-level language. Machine language is the ultimate low-level language.
  • High-level languages are slower and more limited in their ability to access resources such as memory. Some high-level languages are cross-platform - e.g. Java and Javascript. Others are data flow based - e.g. Max/MSP/Jitter, PureData, Quant Composer
Processing, a high-level language, is an extension of Java that includes a graphics library and Integrated Development Environment (IDE) tailored for use by artists and designers. Java provides cross-platform/cross-OS (Operating System) compatibility by running applications through a Java Virtual Machine. Java programs run on top of another application that converts compiled Java code into a OS-appropriate machine readable format.

Processing is an Object Oriented Programming (OOP) language. This coding paradigm supports a modular approach programming that enables developers to create “objects” (small applications with behaviors and attributes) that can be utilized by other applications. OOP enables developers to reuse code more effectively - you know the old cliche "there is no need to re-invent the wheel". (C++ is also an OOP language.

Open Frameworks is a competitive offering to Processing that is based on C++. It contains an image library extension but, unlike processing, it does not include a simple IDE, forcing beginners to use feature-rich IDEs that complicate the learning process. The one benefit of using Open Frameworks is its superior video support.

Getting Started with Processing

Window coordinates start on the top left-hand corner of the window. As in geometry the x-axis refers to the horizontal axis, while the y-axis the vertical.

Functions in Processing follow the same overall syntax (sample below). Each function has predefined numbers and types of inputs and outputs.

functionName(argument 1, argument 2, argument 3, etc.);

In processing it is important to pay attention to the order of the functions in the code. The code is executed from top to bottom. So functions located closer to the top are executed first, which impacts the order of the layering of elements on the screen. Also, it is important to consider that changes to the color setting affect all elements further down in the code.
Here is an overview of color functions available in Processing. Each of these functions can accept from one to four arguments. If only one argument is present than the color will be in grayscale; two arguments are interpreted as grayscale with transparency (known as alpha); three arguments are read as an RGB value; four variables equates to RGBA (RGB with transparency. Each value can range from 0-255.
  • Fill(arg 1, arg 2, arg 3, arg 4); - fill form with color
  • Stroke(arg 1, arg 2, arg 3, arg 4); - color the line of a shape
  • Background(arg 1, arg 2, arg 3, arg 4); - color the background
This week's assignments include:
  • Signing up for the e-mail list
  • Downloading Processing IDE
  • Making a static drawing in processing
  • Check out Processing Monsters website (optional but fun)