In February of this year I posted a video from Wired regarding a new wearable computing prototype that has been recently dubbed "SixthSense". This device was developed by an MIT Media Lab student named is Pranav Mistry. Recently I came across a video from TED, which was posted in March, that goes a little bit deeper into this invention. Since this is a really cool idea I've decided to share this new (or at least newer) video here.
Showing posts with label interface. Show all posts
Showing posts with label interface. Show all posts
Friday, August 7, 2009
Thursday, August 6, 2009
Adam Greenfield on the Rise of Ubiquitous Computing
In the July issue of Interactions magazine I came across an interview with Adam Greenfield. The article, titled At the End of the World Plant a Tree, featured six questions from a lengthy interview that was conducted by Tish Shute in February of this year. As soon as I finished reading this condensed version I made my way to UgoTrade.com to access the full interview, which is well worth the time.

This interview was my introduction to Greenfield and many of his fascinating and thought-provoking ideas. Adam is currently leading Nokia's design direction for services and user-interface. The
focus of this piece is on ideas that he explores in his soon to be released book The City is Here for You To Use.
This upcoming release is Adam's second book, he also keeps a blog called Speedbird and has released an interesting pamphlet called "Urban Computing and Its Discontents". All of his publications investigate the potential shape and impact of ubi-comp on modern life. His first book, titled Everyware: The Dawning Age of Ubiquitous Computing, often made it into my amazon cart, though I never choose to purchase it due to my lack of familiarity with Adam (this is something I plan to remedy shortly).
Interesting topics covered in the interview:
- Definition of relevant concepts such as "onto" and "ontomes". Ontomes refer to a global environment of addressable, queryable, scriptable objects (e.g. the class of objects), while onto refers to any given such object that is part of this environment (e.g. an object instance). These terms are closely related to the concept of "spimes" that was created by Bruce Sterling.
- Conversations regarding evolving perspectives regarding the nature of ubiquitous systems. From Mark Weiser's vision of computers fading into the background, where they appear when needed and disappear when not in use, to Yvonne Rogers’ vision of computers supporting engaged living, helping people engage more actively in things that they do rather than do things for them.
- Discussion regarding Greenfield's principles of ubiquitous computing. These principles are ultimately "codifications of common sense and basic neighborly virtues, expressed in language appropriate to the domain of application."
- Viewpoints on the potential impact of ubiquitous technologies on our society's ability to instigate the necessary changes to create sustainable living practices and lifestyles. Adam's view on this topic is quite skeptical. "sometime in the next sixty years or so a convergence of Extremely Bad Circumstances is going to put an effective end to our ability to conduct highly ordered and highly energy-intensive civilization on this planet."
- Concerns regarding how to enable individuals to manage privacy at three distinct levels: secrecy ("data [that] should not be readable by or understandable by anybody except me or people I designate"), anonymity ("data [that] should be seen by anybody but about whom it is should be knowable only by me or people that I designate"), and autonomy ("my right to live under circumstances which reinforce my sense that I am in control of my own fate").
[picture taken by Pepe Makkonen]
Friday, February 13, 2009
Wearable Projection-Based Interface
Earlier today I came across a post on Wired about a new mobile device prototype that has been unveiled at TED. Designed by MIT Media Lab students, this device uses a projector to display the interface that is manipulated using gestures captured by a video camera. Video demos from Wired are featured below.
In many ways this prototype is similar to the Holographic Projection Interface that I wrote about back in October. The main differences about this design include that it uses normal projection technology rather than a holographic one which is not yet available, and that it leverages internet connectivity to provide contextually relevant information above and beyond GPS navigation. It is also impressive that they have managed to create an actual prototype using $350 worth of equipment - though they are far from creating a commercially viable product, it is pretty impressive prototype.
[via Wired]
Thursday, January 22, 2009
Existing Apps for the AppleTV
Following my earlier post regarding applications for the AppleTV, this past weekend I spent most of my free time installing Boxee and other plug-ins (also referred to as appliances) so that I can experience for myself what they can do. After many hours of research and hit or miss attempts at creating patchsticks and installing applications I was able to jailbreak my AppleTV. Now it can run applications other than Apple’s media center. The most robust ones available are Boxee, XBMC, NitoTV.
Here I will evaluate the benefits and drawbacks provided by a jailbroken AppleTV, the effort required to implement these changes, and the impact on user interaction and interface. My perspective will be utterly personal and totally biased. At the end of it all I will also provide short how-to instructions for anyone attempting the same feat – just don’t blame me if anything goes wrong.
The Benefits
I like AppleTV a lot. Out of the box it offers a cool and easy-to-use interface that enables people to access media, including video, audio and images, via a TV. That said, in its “original” state the AppleTV has a lot of limitations as a media hub.
Its biggest shortcoming is that it cannot tap into the wealth of digital content that is available for streaming online. The only web services available natively are YouTube, Flickr and iTunes. As a consequence, users can only access TV shows and films if they are willing to purchase and/or rent them via iTunes; user generated materials is the only content that can be accessed for free vai AppleTV, using YouTube and Flickr.
The ability to expand the amount of content accessible from the internet is the number one benefit of adding applications to AppleTV. Now I can access Hulu, LastFM, NetFlix and numerous other sources for TV shows, movies and long and short-form web videos (note: that I have not been able to get NetFlix to work properly yet).
The Drawbacks
There are drawbacks to jailbreaking your AppleTV. I’ve noticed that the system occasionally becomes unresponsive and needs rebooting. The AppleTV has also had problems synching with iTunes though the movie rental features continues to work fine. I also continue to be able to stream my collection from my desktop through iTunes. One last consideration is that you cannot update the AppleTV OS because newer versions without running the risk of loosing your applications and data that is not backed up.
The Applications
The three most notable applications that have been installed on my device are Boxee, NitoTV and XBMC. All three enable playback of previously unsupported file formats on the AppleTV and support streaming of content from various online sources. These appliances also provide distinct interfaces for file management and audio/video playback. Essentially, they enable users to customize the interface of their AppleTV. Some people prefer to leverage one of these alternative appliances as their primary AppleTV interface. Here is a brief overview regarding each of these appliances (based on my limited experience playing around with them for week’s worth of nights).
Boxee
This is my favorite of all three applications. Boxee is a multiplatform media center (available for the Mac and PC). The first benefit is that it is easy to install. A simple application is available online that enables people to easily create a USB patchsticks – no need to use the terminal interface on your Mac. Before you install this application you should visit Boxee.tv to sign up for a user account, which is required. (note: the screenshots were taken from a post on the AppleTV Hacks blog).

Boxee features a nice interface that is even more streamlined than Apple’s Frontrow. I was able to quickly find and play the content I was looking for with little difficulty. The main navigation is always easily accessible on the left-hand edge of the screen. To access the menu a user simply has to move the selection past the left-hand column of items on the screen (rather then press the menu button). The exception is when the user is watching videos since they are always displayed in fullscreen.
One really interesting feature that Boxee offers (I would call this their killer app) is the social networking capabilities. This feature enables users to share information about the shows that they are watching, and have watched, with their friends. This functionality enables users to easily find relevant video content in a world where the sources for video content will continue to become more fragmented. A good way to think about this functionality is that it turns each one of your friends into a channel. These channels feature content that your friend has viewed, and/or recommended. All of this from the comfort of your couch. No wonder the networks are scared of this application (as evidenced by the fact that the networks pulled Hulu service from Boxee).
For the most part, the main section of the interface leverages two basic layouts for organizing content: (1) a grid layout featuring thumbnails organizes content categories and video content, including channels, playlists, TV shows, or albums; (2) A list-based interfaces is used for file-level content (e.g. songs or specific TV show episodes) and content sorted by attributes such as artist name. This layout will differ between channels, since each channel is customized. Also worth mentioning are some nice subtle touches they’ve added to the interface. The main navigation menu features local time and weather.

Coupled with the well-designed interface, Boxee is set-up to provide access several good “channels”, including Hulu, YouTube and many others. I was expecting to be able to access movies from NetFlix via Boxee. Unfortunately, I have not been successful in this endeavor yet. (Since NetFlix streams to the Xbox 360 they may soon release an update to the XBMC application that can solve this issue).
From a responsiveness perspective, this interface works pretty well. The videos usually take only a minute or so to start, though I did encounter a few videos that took two to three attempts to launch properly. These problems did not have a strong negative impact on my experience considering that I face similar issues with Apple’s Frontrow.

The video quality varies depending on the channel and piece of content you are watching. Some channels featured YouTube quality videos, while others offered TV resolution (I did not find any HD content). When I first launched Boxee I had a screen alignment problem. I’m happy to report that it was very easy to calibrate the screen.
XBMC
The XBMC media center is my least favorite of the three applications. This appliance is also a multiplatform media center, similar to Boxee. The installation process was equally easy (they are actually installed together using a USB patchstick).

The standard interface is based on that of the original Xbox. This appliance even includes a skin that is similar to the Xbox 360 interface. It seems to have been designed with fans of the Xbox in mind. Though the interface is well designed I did not like it as much as Boxee, but I can imagine that Xbox fans will appreciate the familiar surroundings.
Before I go any further in my critique of this interface, it is important to note that XBMC allows users to redesign the interface by creating their own skin. I am not sure to what extend designers are able to change the interaction design of the system.
The main menu on this application is located on a home screen. In this regard it is similar to the Frontrow menu; the difference is that the XBMC menu is only one level deep. Once users select a path from the main menu they reach the secondary pages, have a simple two-column layout. A local menu is available on the thin left-hand column. On the right, content is organized in either a list or a matrix layout. Further layout variations are available to display results when users select an artist, album or TV show.

NitoTV
This was the most powerful but hardest to use of all of these appliances. To begin with the installation process was considerably more complex than the other two applications. You need to be willing to use the terminal application to install this appliance on your AppleTV. I don’t mean to scare anyone – it is not a hard but it does require basic knowledge of shell commands.

NitoTV leverages the AppleTV’s standard interface. Therefore, it is a great solution to be for anyone who is used to the native interface available on this device and wants to extend its capabilities. I won’t go into details about Apple’s Frontrow interface since it is so pervasive.
Some elements of the interface are not as clean as Boxee and XBMC. That said, the power of NitoTV is related to the wide range of stuff that it lets you do such as playing classic Nintendo and Sega games, view RSS feeds, and launch other applications. (In the interest of full disclosure, I have not set-up the games or launched any new applications from NitoTV yet).
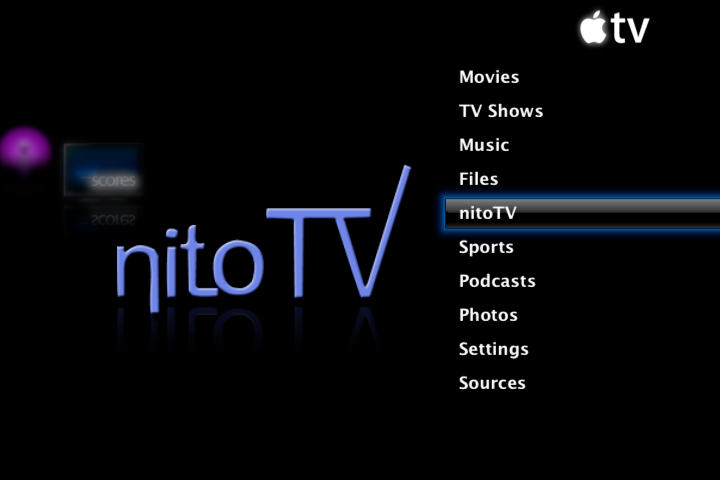
[link to Nito blog]
How to Free Your AppleTV
Though it took me a long time to figure out how to do this, you should be able to do it in about 30 minutes. Before you get excited about trying this out I must caution you that there are risks involved in this procedure – do it at your own (or your AppleTV’s) risk. I strongly recommend that you back up all of your data. Another important consideration is that you should remove all USB drives from your computer while running to flash creator (I’ll tell you more below). Lastly, make sure you read ALL of the instructions below and the updated instructions on the developer’s website.
So if you are still interested, here is what you will need:
Step 1: download the USB flash drive creator for the Apple TV from this website. This application is by far the best solution that I found - download it here. Other patchstick solutions do exist. You can create your own patchstick using scripts from the awkwardTV website and some basic shell commands. Or you can choose to purchase an easy to follow patchstick solution from a website called patchstick.ca. I tried both of these approaches and neither one worked for me – not even the paid approach. If you know of other solution please leave a comment (I’m sure there are other ones out there).
Step 2: Install software on your Mac
Step 3: Plug USB flash drive into your Mac
Step 4: Launch application.
Step 5: Set installation and options The first steps are easy: just select ATV-Patchstick from the installation list; then from the installation options menu select AppleTV version 2.x, and all tools and applications.
Step 6: Set USB target device This step requires great care. If you choose the wrong USB Target Device you can end up erasing all the contents from one of your USB disk drives. If you don’t know the drive number of your USB flash drive then you should use the Disc Utility application to confirm. Another tactic is to remove all other USB drives during installation.
Step 7: Plug USB flash drive into your AppleTV
Step 8: Install the software on your Apple TV To install the software you need to reboot the apple TV by simultaneously pressing the menu and ‘-‘ buttons. When the AppleTV reboots a linux penguin will appear on the screen. Then notes delivered in terminal-style text will begin to appear. The text informs you when the installation is completed. At this point you need to remove the power chord from your AppleTV, leave it unplugged for 5 seconds, then connect it back up.
Step 9: Install Boxee and XBMC Once the AppleTV reboots and you arrive back at the main menu you will notice that there are a few new options available: “Launcher” and “Software Menu”. Select “Launcher” then “Downloads”. Before you are able to open Boxee or XBMC you need to download the applications via this page, even though they already seem to be available via the menu.
Step 10: Install NitoTV The process for installing NitoTV is a bit more complex because you need to use the terminal on your Mac. You can download the application from this page, then just follow the instructions on the read me file.
Here I will evaluate the benefits and drawbacks provided by a jailbroken AppleTV, the effort required to implement these changes, and the impact on user interaction and interface. My perspective will be utterly personal and totally biased. At the end of it all I will also provide short how-to instructions for anyone attempting the same feat – just don’t blame me if anything goes wrong.
The Benefits
I like AppleTV a lot. Out of the box it offers a cool and easy-to-use interface that enables people to access media, including video, audio and images, via a TV. That said, in its “original” state the AppleTV has a lot of limitations as a media hub.
Its biggest shortcoming is that it cannot tap into the wealth of digital content that is available for streaming online. The only web services available natively are YouTube, Flickr and iTunes. As a consequence, users can only access TV shows and films if they are willing to purchase and/or rent them via iTunes; user generated materials is the only content that can be accessed for free vai AppleTV, using YouTube and Flickr.
The ability to expand the amount of content accessible from the internet is the number one benefit of adding applications to AppleTV. Now I can access Hulu, LastFM, NetFlix and numerous other sources for TV shows, movies and long and short-form web videos (note: that I have not been able to get NetFlix to work properly yet).
The Drawbacks
There are drawbacks to jailbreaking your AppleTV. I’ve noticed that the system occasionally becomes unresponsive and needs rebooting. The AppleTV has also had problems synching with iTunes though the movie rental features continues to work fine. I also continue to be able to stream my collection from my desktop through iTunes. One last consideration is that you cannot update the AppleTV OS because newer versions without running the risk of loosing your applications and data that is not backed up.
The Applications
The three most notable applications that have been installed on my device are Boxee, NitoTV and XBMC. All three enable playback of previously unsupported file formats on the AppleTV and support streaming of content from various online sources. These appliances also provide distinct interfaces for file management and audio/video playback. Essentially, they enable users to customize the interface of their AppleTV. Some people prefer to leverage one of these alternative appliances as their primary AppleTV interface. Here is a brief overview regarding each of these appliances (based on my limited experience playing around with them for week’s worth of nights).
Boxee
This is my favorite of all three applications. Boxee is a multiplatform media center (available for the Mac and PC). The first benefit is that it is easy to install. A simple application is available online that enables people to easily create a USB patchsticks – no need to use the terminal interface on your Mac. Before you install this application you should visit Boxee.tv to sign up for a user account, which is required. (note: the screenshots were taken from a post on the AppleTV Hacks blog).

Boxee features a nice interface that is even more streamlined than Apple’s Frontrow. I was able to quickly find and play the content I was looking for with little difficulty. The main navigation is always easily accessible on the left-hand edge of the screen. To access the menu a user simply has to move the selection past the left-hand column of items on the screen (rather then press the menu button). The exception is when the user is watching videos since they are always displayed in fullscreen.
One really interesting feature that Boxee offers (I would call this their killer app) is the social networking capabilities. This feature enables users to share information about the shows that they are watching, and have watched, with their friends. This functionality enables users to easily find relevant video content in a world where the sources for video content will continue to become more fragmented. A good way to think about this functionality is that it turns each one of your friends into a channel. These channels feature content that your friend has viewed, and/or recommended. All of this from the comfort of your couch. No wonder the networks are scared of this application (as evidenced by the fact that the networks pulled Hulu service from Boxee).
For the most part, the main section of the interface leverages two basic layouts for organizing content: (1) a grid layout featuring thumbnails organizes content categories and video content, including channels, playlists, TV shows, or albums; (2) A list-based interfaces is used for file-level content (e.g. songs or specific TV show episodes) and content sorted by attributes such as artist name. This layout will differ between channels, since each channel is customized. Also worth mentioning are some nice subtle touches they’ve added to the interface. The main navigation menu features local time and weather.

Coupled with the well-designed interface, Boxee is set-up to provide access several good “channels”, including Hulu, YouTube and many others. I was expecting to be able to access movies from NetFlix via Boxee. Unfortunately, I have not been successful in this endeavor yet. (Since NetFlix streams to the Xbox 360 they may soon release an update to the XBMC application that can solve this issue).
From a responsiveness perspective, this interface works pretty well. The videos usually take only a minute or so to start, though I did encounter a few videos that took two to three attempts to launch properly. These problems did not have a strong negative impact on my experience considering that I face similar issues with Apple’s Frontrow.

The video quality varies depending on the channel and piece of content you are watching. Some channels featured YouTube quality videos, while others offered TV resolution (I did not find any HD content). When I first launched Boxee I had a screen alignment problem. I’m happy to report that it was very easy to calibrate the screen.
XBMC
The XBMC media center is my least favorite of the three applications. This appliance is also a multiplatform media center, similar to Boxee. The installation process was equally easy (they are actually installed together using a USB patchstick).
The standard interface is based on that of the original Xbox. This appliance even includes a skin that is similar to the Xbox 360 interface. It seems to have been designed with fans of the Xbox in mind. Though the interface is well designed I did not like it as much as Boxee, but I can imagine that Xbox fans will appreciate the familiar surroundings.
Before I go any further in my critique of this interface, it is important to note that XBMC allows users to redesign the interface by creating their own skin. I am not sure to what extend designers are able to change the interaction design of the system.
The main menu on this application is located on a home screen. In this regard it is similar to the Frontrow menu; the difference is that the XBMC menu is only one level deep. Once users select a path from the main menu they reach the secondary pages, have a simple two-column layout. A local menu is available on the thin left-hand column. On the right, content is organized in either a list or a matrix layout. Further layout variations are available to display results when users select an artist, album or TV show.

NitoTV
This was the most powerful but hardest to use of all of these appliances. To begin with the installation process was considerably more complex than the other two applications. You need to be willing to use the terminal application to install this appliance on your AppleTV. I don’t mean to scare anyone – it is not a hard but it does require basic knowledge of shell commands.

NitoTV leverages the AppleTV’s standard interface. Therefore, it is a great solution to be for anyone who is used to the native interface available on this device and wants to extend its capabilities. I won’t go into details about Apple’s Frontrow interface since it is so pervasive.
Some elements of the interface are not as clean as Boxee and XBMC. That said, the power of NitoTV is related to the wide range of stuff that it lets you do such as playing classic Nintendo and Sega games, view RSS feeds, and launch other applications. (In the interest of full disclosure, I have not set-up the games or launched any new applications from NitoTV yet).
[link to Nito blog]
How to Free Your AppleTV
Though it took me a long time to figure out how to do this, you should be able to do it in about 30 minutes. Before you get excited about trying this out I must caution you that there are risks involved in this procedure – do it at your own (or your AppleTV’s) risk. I strongly recommend that you back up all of your data. Another important consideration is that you should remove all USB drives from your computer while running to flash creator (I’ll tell you more below). Lastly, make sure you read ALL of the instructions below and the updated instructions on the developer’s website.
So if you are still interested, here is what you will need:
- A USB thumb drive. Note that not all USB can boot an AppleTV so here is list of USB drives that are known to work. http://forum.boxee.tv/archive/index.php/t-1240.html
- AppleTV software version 2.3 or earlier. If you have a newer version of AppleTV than this probably won’t work. As of today version 2.3 is the latest one.
- Broadband internet connection to a network that serves your computer and the AppleTV.
Step 1: download the USB flash drive creator for the Apple TV from this website. This application is by far the best solution that I found - download it here. Other patchstick solutions do exist. You can create your own patchstick using scripts from the awkwardTV website and some basic shell commands. Or you can choose to purchase an easy to follow patchstick solution from a website called patchstick.ca. I tried both of these approaches and neither one worked for me – not even the paid approach. If you know of other solution please leave a comment (I’m sure there are other ones out there).
Step 2: Install software on your Mac
Step 3: Plug USB flash drive into your Mac
Step 4: Launch application.
Step 5: Set installation and options The first steps are easy: just select ATV-Patchstick from the installation list; then from the installation options menu select AppleTV version 2.x, and all tools and applications.
Step 6: Set USB target device This step requires great care. If you choose the wrong USB Target Device you can end up erasing all the contents from one of your USB disk drives. If you don’t know the drive number of your USB flash drive then you should use the Disc Utility application to confirm. Another tactic is to remove all other USB drives during installation.
Step 7: Plug USB flash drive into your AppleTV
Step 8: Install the software on your Apple TV To install the software you need to reboot the apple TV by simultaneously pressing the menu and ‘-‘ buttons. When the AppleTV reboots a linux penguin will appear on the screen. Then notes delivered in terminal-style text will begin to appear. The text informs you when the installation is completed. At this point you need to remove the power chord from your AppleTV, leave it unplugged for 5 seconds, then connect it back up.
Step 9: Install Boxee and XBMC Once the AppleTV reboots and you arrive back at the main menu you will notice that there are a few new options available: “Launcher” and “Software Menu”. Select “Launcher” then “Downloads”. Before you are able to open Boxee or XBMC you need to download the applications via this page, even though they already seem to be available via the menu.
Step 10: Install NitoTV The process for installing NitoTV is a bit more complex because you need to use the terminal on your Mac. You can download the application from this page, then just follow the instructions on the read me file.
Saturday, December 13, 2008
The Design of Interactions with Music - Portable Devices
Continuing on the topic of designing interactions with music, here are a some examples of lo-tech hacks and and innovative new designs that enable people to interact with music in cool ways. The consistent thread that runs through all of these examples is that these instruments are all portable but are not mobile devices, such as cell phones and mobile gaming units.
The "Ghetto" Talkbox
In my recent post regarding music interactions on mobile devices I shared an example of a Nintendo DS Lite that had been hacked into a talkbox. Here is a lo-tech way to create a talkbox, taught by Moot BooXLe. Before watching this video I had not clue how musicians play with a talkbox. It's pretty interesting: the talk box has a long tube that is placed in the musicians mouth, it is also hooked up to another instrument (usually a keyboard). Therefore, the musician modulates the music that is played from the instruments by talking or blowing air into the tube.
All you need to create your own "ghetto" talkbox is a plastic tube, a PVC end cap, a cheap powered speaker, a box, and some duct tape. Add to this one to two hours of labor and you've got yourself a talk box. It's pretty cool how you interact with the talk box.
Lo-Tech Drums
I know that this is an extremely lo-tech solution; it is by far the most lo-tech feature on this post. All that said, I think it is worth sharing because, though it uses no electronic components, it is a well designed little system. Notice how even though the drummer only interacts directly with the books while the sounds are created as a result of the interaction between the books and the other objects placed on top of the books as well.
Beat Blocks
This is the first electronic music interface from the bunch. Beat blocks is a physical computing interface that enables users to control four different 4/4 loops. Each loop contains a drum track that can be modified on-the-fly by placing or removing blocks of wood into one of 16 different slots that are arranged in a 4/4 formation on a square plank of wood. There are several different types of block. Each block features from 1 to 4 stripes; each stripe denotes the existence and timing of a beat. The pattern of each loop is determined by the presence of these blocks on the 4 consecutive slots that make up that loop.
What I like about this interface is the way it integrates virtual attributes into physical objects. However, this system has limited capabilities and my interest in it is more related to its experimental nature. Most interfaces that use today to interact with music software on computers is derived from physical equipment (guitar, mixers, etc). That is not to say that a different interaction paradigm that is enabled by technology cannot be created. Hence the importance of experimenting beyond our accepted modes of interactions.
Beat Bearing Demo
This interface offers a similar mode of interaction to the beat blocks via a prototype that has a considerably better finished and some improvements. This tool supports interaction based on a physical computing interface that enables users to control four different 8 beat loops. Each loop contains a drum track that can be modified on-the-fly by placing or removing metal bearings into one of 32 slots that are arranged in a 4/8 formation on a rectangular plastic casing. Each row of 8 slots represents one 8-beat loop, while each slot on this casing represents a single beat.
The one-to-one relationship between bearing/slot/beat makes this interface easier to understand and use than beat blocks. It also provides the user with greater freedom to manipulate sounds. The one area where the beat blocks outperforms beat bearing is in regards to the length of the loop itself - beat blocks supports four 16-beat loops, as opposed to four 8-beat loops. Similar to beat blocks, the beat bearing interface is a mere prototype that is not commercially available (unlike the Tenori ON, which I will discuss next).
Tenori-on
The Tenori-on is a unique electronic music instrument designed by Toshio Iwai and Yu Nishibori. This device was originally created in 2005 but it was only released in 2007 after Toshio Iwai held live performances in clubs in several European cities. In his own words, here is the inspiration behind this creation:
"In days gone by, a musical instrument had to have a beauty, of shape as well as of sound, and had to fit the player almost organically. [...] Modern electronic instruments don't have this inevitable relationship between the shape, the sound, and the player. What I have done is to try to bring back these [...] elements and build them in to a true musical instrument for the digital age." [taken from wikipedia]
It is a pretty powerful tool, check out the video below of a Hot Chip cover performed with a Tenori-on. This device is consists of a screen that features a 16x16 grid of LED switches. Each switch is multi-purpose and can be activated in various ways to create music. The device also has a frame that contains a small LED monitor, two built-in speakers located and a dial and buttons that control other functionality such as the type of sound and beats per minute produced.
Drum Buddy Demo
The Drum Buddy is an analog-chic electronic instrument that, unlike the three previous examples, is obviously not a digital device. This instrument was invented by an eccentric artist from New Orleans named Quintron. The Drum Buddy has an innovative design that is described as a light-activated oscillating drum machine.
Here is my attempt at describing how it works: light, which is emitted by a light bulb mounted on the device, is captured by photo-sensors that activate oscillators, which generate sounds. These oscillators can be turned on and off, and controlled via switches. They can also be modulated by controlling the presence and amount of light. Check out the video below to see it in action, or check out the wikipedia entry.
This instrument is for true musicians (or very wealthy music lovers). There are extremely few of these in existence though they are still being produced in small batches. They occasionally go on sale on ebay with a $5000 starting bid. During my investigation about this instrument I came across an interesting quote from Quintron about why he created this analog electronic instrument:
"I believe that the digital revolution has cut short the development of new analog electronic instruments - this is a mistake. Analog instruments are presently regarded as charming primitive antiques. Though the DRUM BUDDY and its older analog siblings can create far fewer "types" of sounds than a contemporary digital sampling keyboard, if you analyzed the waveforms of both you would find the DRUM BUDDY sounds to be in a constant state of subtle fluctuation, whereas the digital sounds - since they are really composed of little uniform building blocks - will be rigid and unchanging unless some parameter on the instrument is changed. The analog sounds of the DRUM BUDDY, however, are constantly changing themselves - shimmering with a living complexity which even the 24 bit digital signal could never truly possess." [from Drum Budy site]
Sunday, November 23, 2008
Interaction Design Basics: Presentations from Bill DeRouchey
Since I kicked off my interaction and experience design curriculum a few months ago I've been following Bill DeRouchey's blog, which is aptly titled push.click.touch. Unfortunately, shortly after I started following his blog Bill stopped posting, his last contribution taking place on August 28th.
Earlier today I checked out his site to take a look at some of his older posts to find out if he had any older nuggets of wisdom to impart - this is in opposition to my usual practice of remaining on my side of an RSS reader. I was happy to find several presentations that Bill has developed for conferences on the topic of Interaction Design. Here is a quick overview of three presentations that I found very informative (if you are already an interaction design pro you probably won't find these very interesting. That said, they are great for novices like me).
In his presentation, Language of Interaction Design Bill provides an overview of basic interaction design concepts. In this presentaiton Bill makes a strong case regarding the fact that a language of interaction design already exists. By "language" Bill refers to the fact that people have already learned to attach specific meaning to colors, shapes, etc. Therefore, designers need to take these language into account when designing interactions. For example, designers should use green to signify a start button and red to signify a stop button.
Another interesting presentation created by Bill is entitled History of the Button. Here, Bill provides a high-level overview of how buttons evolved from late 1800's when Kodak first put a button on a camera to today when the button is a virtual area that is defined by the content on a computer screen - "clicking" a button has evolved to "touching" a surface. Soon the button will be the environment as we start seeing more gesture-based interfaces. To wrap up the presentation Bill reminds us how all of these "buttons" will need to be designed.
Tuesday, October 28, 2008
Cool Design: Holographic Projection Interface
Check out this interesting portable computing concept that I found on PSFK, from a post titled Augmented Reality Using Holographic Projection. This portable interaface is known as Ringo and was designed by Ivan Tihienko. It enables users to interact with the computer using their hands and feet. It is based on holographic projections; the video below illustrates several potential capabilities including messaging, GPS and a cool two-player game of air hockey.
The concept is very cool, I predict that this technology could revolutionize the way we interact with computers (rather obvious prediction, I know). It would add a physical dimension to the interface that will afford many new interaction possibilities at home or on the go. In public environments this type of interface will be leveraged primarily for multi-user applications. Many people would feel uncomfortable flapping their arms in the air in public spaces in order to write a message or carry out other similar interactions. However, in more private places users will likely engage in wider variety of both single and multi-user interactions.
In the realm of mobile devices this technology could be marketed as a task-specific gadget, such as a gaming system; it could also be included as a secondary interface on mobile phones/PDAs (I want one on my phone). This interface is not appropriate as a primary interface on mobile phones/PDAs because the privacy provided via traditional interfaces is more appropriate for many type of applications. For example, you don't want people to be able to read your emails, or SMS conversations; you probably don't want them to always know who you are calling as well.
In the realm of mobile devices this technology could be marketed as a task-specific gadget, such as a gaming system; it could also be included as a secondary interface on mobile phones/PDAs (I want one on my phone). This interface is not appropriate as a primary interface on mobile phones/PDAs because the privacy provided via traditional interfaces is more appropriate for many type of applications. For example, you don't want people to be able to read your emails, or SMS conversations; you probably don't want them to always know who you are calling as well.
Thursday, October 16, 2008
The Death of Rollovers
I just realized today how rollovers don't work on touchscreen displays - I know this probably seems obvious to those with experience designing applications for touchscreen displays. I had this realization when I was visiting the Guggenheim website on an iPhone. The home page for the Guggenheim organization features a pictures of their museums and the names of the city appear only on rollover. Therefore, I was only able to see the name of the city where a museum was located only when I clicked on the picture of that specific museum. As touchscreen displays continue to become more commonly available, designers will not be able to rely on rollovers to display useful information about the behavior of a button.
Saturday, October 4, 2008
Multi-Touch Interfaces From IDEO and Others
I recently came across a few posts on the IDEO Lab blog about multi-touch computing. I am a huge fan of touch computing. My experiences with these types of interfaces are limited to the iPhone, the SmartBoard from my wife's classroom, and random retail and public instalations that use Microsoft's Surface or other technologies.
I had never really thought much about the collaborative potential of large scale multi-touch interfaces. It seems obvious now, after reading about the IDEO Lab's experiments. Here is a great quote from one of their blog postings about the collaborative nature of multi-touch systems: "multi-touch, particularly on large displays, assumes multiple inputs at the same time. Multiple fingers, yes, or multiple hands from multiple people. In other words, it’s a system designed for “us” instead of for “me” — for collaboration instead of heads-down work."
Here are three videos that show the potential of multi-touch systems in action. The first video covers a talk from Jeff Han at TED in 2006. In this talk he introduces his Perceptive Pixel multi-touch display and makes the case for basing future computer interfaces on this type of technology. The second video documents a "Home-Brew" project from IDEO, check out this story about how they put this together. The third video shows a prototype from Perceptive Pixel.
Jeff Han's Talk at Ted
IDEO's Multi-Touch Project
Perceptive Pixel's Multi-Touch Project
Subscribe to:
Posts (Atom)