Here is an update regarding the design of the base for the cat toy that I have been building for my Introduction to Physical Computing final project. This post is a long time coming - I planned to post this information several weeks ago but was forced to wait due to the general workload surrounding finals.
Unfortunately, I was not able to finalize this project by the end of the semester due to issues that I encountered with the stepper motors, and creating a system of gears and pulleys that are able to move the cat toy structure (I've already created a post with information regarding the stepper motor-related issues, I will review the issues encountered when creating the gear and pulley systems here). That said, first let's take a look at the design for the cat toy base.
The Design of the Cat Toy Base
When I started working on the design for this device I envisioned using an existing cat scratching post as the base for my creation. This was an ideal solution since these toys feature a strong base that can withstand the tug from cats. Unfortunately, I did not find any existing products in a form factor that can work with my vision of this toy.
Once I realized that I had to create my own base structure, I decided that I wanted to build it using recycled materials. Considering how much Sasha likes cardboard scratching posts and the amount of cardboard boxes that are discarded in NY, I decided to use cardboard as the primary material for the base. The main considerations that drove my design included: allowing sufficient space to house the arm, laser, speaker, and proximity sensor; creating a shape that would appeal to the cat and allow for easy scratching; and making sure that the base was stable enough to withstand a beating from Sasha.
Here are a few important notes about the sketch designs featured below: first off, the light brown areas illustrate the internal compartment of the toy base where the chips, sensors, and motors will be stored; secondly, the two protruding structures at the top of the base will hold the toy wand and the laser; lastly, for the initial version of the toy I have decided to remove the cat laser (this will of course be reflected in all future pictures related to this prototype).
The Structure that Supports Movement
The biggest challenge I have encountered in developing this prototype is designing and building the mechanism of motion for the wand. Once I was able to get the motors working properly (which was a challenge in and of itself), I started working on finding a solution for the structure that would hold the wand, and for transferring the motion from the motors to move the wand.
After a considerable amount of research I decided to purchase an erector to create the structure for the wand. The specific set that I purchased is pictured here. This is a great solution because the parts in this set can be easily combined and recombined to created a strong structure that supports different types of movement.
Finding a solution for the gear and pulley mechanism was much tougher. The first challenge was to understand how gears and pulleys work together, so that I could design a system and find the appropriate parts. After doing some initial research, I decided to use Lego Mindstorm gears to build my initial prototype. Unfortunately, this approach did not work because the gear connection to the shafts was too loose, especially after the motor heated up.
After talking to some colleagues at ITP (thank you Michael K), I realized that what I needed was gears with hubs and set screws similar to the one featured on this page. These types of gears can be fastened securely to shafts of slightly varying thickness. SDP-SI has by far the largest selection of gears and pulleys on the web. Unfortunately, these components are not cheap.
The solution that I ultimately selected was to purchase a set of gears from Eitech that is compatible with the shafts from my erector set. The Girders and Gears website was a great resource that helped me find this solution. This site features useful information about various types of building sets and related gears and pulleys. Unfortunately, I have not yet had a chance to test these new gears. I plan on doing so as soon as I return to New York in mid-January.
One additional approach that I considered was creating my own gears, using a 3D sketching program and a laser cuter. Here is a link to step-by-step instructions for designing and producing custom gear sets.
Showing posts with label ITP. Show all posts
Showing posts with label ITP. Show all posts
Friday, January 1, 2010
Saturday, December 26, 2009
Creating a Collaborative Storytelling Experience
As luck would have it, I was assigned to present in Red's Application class during the last week of school. Needless to say, I was dreading having to juggles multiple final projects with this important assignment. This anxiety was only heightened by the stories of suffering from many of the groups that preceded us.
Now that I have lived through this insanely busy time I am happy to report that I thoroughly enjoyed working on this project. It gave me a chance to collaborate with an awesome group of people, we were provided with the opportunity to respond to a very interesting speaker, and we were able to create a fun and collaborative way to end of semester.
Our task was to create a response to Jake Barton's presentation, which focused on collaborative storytelling installations and projects. Here is a link to my detailed notes from this class. To get started working on the presentation we met right after Jake's presentation. We quickly settled on a general direction - creating a collaborative experience that engaged the entire class in a storytelling exercise.
Development and Execution of Installation
After meeting with Todd and holding some additional brainstorm sessions, we decided to focus our response on creating a platform for first-year students to contribute their ITP stories for the development of a meta-narrative. After additional discussions we decided to keep things low-tech, and to limit the activities to the time and physical space of the class itself (we did not want to give other student's "homework" during finals).
The design of our installation was focused around a physical timeline, to which students would add their own stories using stickies or by drawing directly onto the surface itself. To inspire our peers we added a few initial elements to the timeline and we created a video featuring work from first-year students developed throughout the semester. Below you will find a short video overview of our development process, along with the video we developed for the event itself, and some pictures from the event.
Video Featuring Work from 1st Year Students
Pictures from Collaborative Storytelling Event
Tuesday, December 22, 2009
Sunnyside Animation - Learning After Effects
For my final project in Comm Lab I partnered with Tamar Ziv to put the finishing touches on our After Effects animation. This project was inspired by Brazilian graffiti, old Library of Congress photos, and music from Deerhoof.
The graffiti images were all curated from a large selection of pictures I have collected from my trips to Brazil (here is a link to some of the original source materials); the LoC pictures were found on flickr; the Deerhoof track comes from Tamar's meticulous selection of this band's releases.
The graffiti images were all curated from a large selection of pictures I have collected from my trips to Brazil (here is a link to some of the original source materials); the LoC pictures were found on flickr; the Deerhoof track comes from Tamar's meticulous selection of this band's releases.
It took us two weeks and about 40 hours of work to put this 30-second piece together - I never knew how much work it took to put one of these together. The first week was extremely frustrating, we spent most of the time struggling to learn how to use After Effects. The second week was much more productive and effortless. I was actually enjoying working in After Effects when we wrapped up this project.
The biggest problem we encountered was associated to synching the music with the animation. To get these elements synched as best as possible we exported individual animation sequences and then put them together in Final Cut. In the coming weeks I plan on sharing my early notes and learnings regarding After Effects and Final Cut.
Cats vs. Bat Game - My Final ICM Final
Now that finals are finished I finally have some time to devote to this journal. Needless to say, a lot has happened during the last month that I have not yet shared here. Let's begin with an update regarding the ICM final.
Over the weekend I finished my final project for ICM, which is an updated version of the fangs invaders game that is titled "Cats vs Bats". This updated version of the game is almost unrecognizable from the previous one. Here is a link to an online version of the game (please note that you need to have a fast internet connection to play it because it is not web optimized), followed by a brief description of the game coupled with a list of the latest updates.

You can also download the game here: mac version | windows version.
Project overview: cats vs bats is simple space invader-like game. In this game, a small oriental shorthair cat named Sasha is our only hope to save the world against a swarm of diseased bats.
Though currently this project is screen-based only, I am working on developing a cat toy that will be used in conjunction with this application. A single joystick controller has been created that can be used to control either or both of these projects (so that you can play the game and with your cat at the same time). Also, the proximity of the cat to the toy will enable a player to earn bonus points in the Cats vs. Bats game.
Main updates: Here is an overview of the main updates that I have been working on over the past several weeks. Over the winter break I plan on delving deeper into a few of these areas (such as use of vectors to drive bat motion).
• Improve game scoring logic and add score to game play environment.
• Create an online high-score database.
• Improve animation by making flight patter more random and natural.
• Update look and feel of the game by adding back images and improving design.
• Include bonus points opportunities.
• Add stages with increasing levels of difficulty.
Over the weekend I finished my final project for ICM, which is an updated version of the fangs invaders game that is titled "Cats vs Bats". This updated version of the game is almost unrecognizable from the previous one. Here is a link to an online version of the game (please note that you need to have a fast internet connection to play it because it is not web optimized), followed by a brief description of the game coupled with a list of the latest updates.
You can also download the game here: mac version | windows version.
Project overview: cats vs bats is simple space invader-like game. In this game, a small oriental shorthair cat named Sasha is our only hope to save the world against a swarm of diseased bats.
Though currently this project is screen-based only, I am working on developing a cat toy that will be used in conjunction with this application. A single joystick controller has been created that can be used to control either or both of these projects (so that you can play the game and with your cat at the same time). Also, the proximity of the cat to the toy will enable a player to earn bonus points in the Cats vs. Bats game.
Main updates: Here is an overview of the main updates that I have been working on over the past several weeks. Over the winter break I plan on delving deeper into a few of these areas (such as use of vectors to drive bat motion).
• Improve game scoring logic and add score to game play environment.
• Create an online high-score database.
• Improve animation by making flight patter more random and natural.
• Update look and feel of the game by adding back images and improving design.
• Include bonus points opportunities.
• Add stages with increasing levels of difficulty.
Thursday, December 10, 2009
Creating Movement for the Cat Toy
Over the past couple of days I have struggled in my attempts to set up a stepper motor. Late last week my struggle continued as I tried to set-up three new stepper motors that I received for the cat that I am building. Having come home defeated I decided that the best course of action was for me to do some research regarding how stepper motors work so that I can improve my understanding and conceptual model of this component.
In the last hour I have discovered two really good overviews of how steppers work. The first is Mike Cook’s overview on his instructional blog; this is the second time that I link to Mike’s blog, he has a lot of great content for beginner's like me. This tutorial helped me finally understand how the coils are arranged and organized within the motor and how the stepping sequence is able to move the motor rotor through different positions. In retrospect it all seems obvious.
Another website that has content that is worth checking out is stepperworld.com. The tutorial here does not provide as thorough an overview of the inner workings of stepper motors. However, it does a better job at providing guidance for figuring out the proper wiring sequence of a stepper motor.
So what the hell did I learn about the topics mentioned above? Here is a brief overview but for more in-depth information check out the two links above.
Structure of the coils inside the motor
 The coils in stepper motors are wrapped around a structure that surrounds the rotor. The number of times that the coils are wrapped around the rotor determines the number of steps required for the motor to make one full rotation. For example if the coils are wrapped around 48 times, then the motor would take 48 steps to complete one full rotation. Here is an image from Mike Cook’s site that illustrates this design.

To move the motor the coils are energized in sequence. Motors can be used in two different modes: full-step and half-step. When two coils are energized at any given time the motor moves in full step, which provides greater torque but less precision. When the motor is energized one coil at a time it provides greater precision of movement (twice the number of steps per rotation) but less torque. Here is another image from Mike's blog that demonstrates how full-step movement works.
Now that I understood how stepper motors work, I had to figure out the proper step and wiring sequence to get the motor to work properly. I started by re-checking all wire connections to ensure that I attached the leads from the motors to the appropriate control pins (via the transistors) and power source pins. This was a good thing because I realized that I had attached one of the power wires to a control pin.
Once I the wiring was set-up properly I was still experiencing issues with the stepper motors. They would turn on and spin for 10 to 20 seconds, then they would stop working. I met with Xiaoyang, one of ITP's residents, regarding this issue. He recommended that I test the power source voltage and amperage. The motor’s rating is 5 volts at 1 amp. Based on Xioayang’s advice and my research online, I decided that I needed to find a power source that delivered twice the current required by the motor.
I purchased a 2 amp transformer from Radio Shack that can be set to output between 3v to 7v. It is a great little tool, and it brought my motors to life! I was dancing around the table when this happened. It seems like I may actually be able to bring my cat toy to life. My next challenge was getting multiple motors to run smoothly together smoothly. The code samples that I've found and the stepper motor library are not appropriate for controlling multiple motors - more on this on my next post on this subject.
In the last hour I have discovered two really good overviews of how steppers work. The first is Mike Cook’s overview on his instructional blog; this is the second time that I link to Mike’s blog, he has a lot of great content for beginner's like me. This tutorial helped me finally understand how the coils are arranged and organized within the motor and how the stepping sequence is able to move the motor rotor through different positions. In retrospect it all seems obvious.
Another website that has content that is worth checking out is stepperworld.com. The tutorial here does not provide as thorough an overview of the inner workings of stepper motors. However, it does a better job at providing guidance for figuring out the proper wiring sequence of a stepper motor.
So what the hell did I learn about the topics mentioned above? Here is a brief overview but for more in-depth information check out the two links above.
Structure of the coils inside the motor
The coils in stepper motors are wrapped around a structure that surrounds the rotor. The number of times that the coils are wrapped around the rotor determines the number of steps required for the motor to make one full rotation. For example if the coils are wrapped around 48 times, then the motor would take 48 steps to complete one full rotation. Here is an image from Mike Cook’s site that illustrates this design.Now that I understood how stepper motors work, I had to figure out the proper step and wiring sequence to get the motor to work properly. I started by re-checking all wire connections to ensure that I attached the leads from the motors to the appropriate control pins (via the transistors) and power source pins. This was a good thing because I realized that I had attached one of the power wires to a control pin.
Once I the wiring was set-up properly I was still experiencing issues with the stepper motors. They would turn on and spin for 10 to 20 seconds, then they would stop working. I met with Xiaoyang, one of ITP's residents, regarding this issue. He recommended that I test the power source voltage and amperage. The motor’s rating is 5 volts at 1 amp. Based on Xioayang’s advice and my research online, I decided that I needed to find a power source that delivered twice the current required by the motor.
I purchased a 2 amp transformer from Radio Shack that can be set to output between 3v to 7v. It is a great little tool, and it brought my motors to life! I was dancing around the table when this happened. It seems like I may actually be able to bring my cat toy to life. My next challenge was getting multiple motors to run smoothly together smoothly. The code samples that I've found and the stepper motor library are not appropriate for controlling multiple motors - more on this on my next post on this subject.
[note: most of this post was written during last weekend on December 4th]
Wednesday, December 2, 2009
Jake Barton Presentation Notes
So this week I am on the hook for Red's class presentation. Earlier today I attended class and got a chance to watch Jake Barton, founder and principal at Local Project, whose presentation we will need to respond to. Here are my notes from tonight's class. I'm keeping the presentation ideas private for now.
Local Project is a design firm that is focused on developing collaborative storytelling experiences using spatial and virtual media. Company focuses on media design portion of the equation; they partner with architecture and installation design firms to develop the physical design of the experiences.
Overview and reactions to key projects:
(1) Caring Aspiration - J&J Pavilion at the Beijing Olympics: Installation featured a series of stories told by people from many different parts of the world in their native tongue. Each story was captured in video in a vertical format and featured subtitles in two languages. The stories had been professionally video-taped and curated in the months leading up to the Olympics.
Reaction: this exhibition was Jake's least inspiring work in large part because the interaction has a strong top-down control structure compared to his other projects (e.g. StoryCorps, and 9/11 Memorial Museum). The stories that are featured are small in number and have all been recorded in a similar style. Due to the highly curated nature of this installation it is not able to reach collaborative storytelling platform status - it remains in the category of collaborative storytelling "installation".
(2) Official NYC Information Center: This city-funded information center was created to help tourists explore New York City. It was designed to bring an enhanced version of online-like browsing into the physical world. The space features numerous tabletop interactive maps, physical computing icons that represent virtual information, and other large screen displays (of course, all of these devices support eight languages). At the end of the experience tourists are able to get a customized NY guide or information printed, emailed, or sent via text message.
Reaction: I like the idea of this project because it focuses on leveraging physical space to help people navigate, interact with, and understand information related to New York City. I also appreciate how the project enables people to take with them a digital product of their interaction with the devices at this highly specialized location. I look forward to visiting this information center in the next couple of days.
(3) Brooklyn Historical Society: This project focused on highlighting Brooklyn's relationship to the abolition movement by highlighting specific locations in the neighborhood that have historical significance. These points of interests were used as sites for projections of pictures of residents of these areas from those times long past.
Reaction: I felt that this is one of Jake's less inspired projects. It's focus is primarily on the augmenting these locations with information about the past, there is no collaborative element in this piece.
(4) Jewish-Polish American Museum (? not sure about this name) - multiple exhibitions. The two projects that caught my attention included one that explored stories of Jewish immigrants to America with a focus on their reasons for migrating; and a second that created a space for museum goers where they could have a mediated interactions with others in their community to discuss important questions.
Reaction: I am really impressed by the second project that mentioned above because it totally changes the role of a museum within a community. It makes the museum a much a more progressive institution that embraces the community in a conversation about the current state of our society - rather than a space that offers an singular (even if sometimes varied) institutional perspective.
(5) StoryCorps [Link to Project Page]: This is an awesome project that was developed to capture stories about the lives of everyday american people, from their own perspective using physical installations in high-traffic areas. It provides two friends or family members with a recording booth for 45 minutes, offering the chance for one participant to interview the other. At the end of the session the two participants leave with a DVD copy of the conversation, and the recording is saved in the Library of Congress. All of this takes place in a relatively small recording booth that lives in kiosks located in several major US cities.
Reaction: I have known about this project for a long time from NPR, it is truly an amazing idea. I actually always wondered who had created StoryCorps. It is one of the coolest and best executed collaborative storytelling projects around. The physical aspect of the execution is a crucial element to the success of this project. The context adds a lot of meaning (importance) to the conversation.
(6) Make History 911 [Link to Project Page]: This is a web-based collaborative storytelling project about the history of september 11th. It allows users to add their stories, pictures and videos to the tapestry of stories that already exist on the site.
Reaction: This project has successfully provided people from all over the world with an opportunity to share their experiences related to september 11th. In the process each person has the opportunity to take part in writing the history about this important moment in our shared lifetime. I think this is a pretty cool way to change the way that history is written. It is definitely a storytelling platform.
(7) September 11 Memorial Museum: This large project features some interesting combinations of environmental media and collaborative storytelling. I was specifically interested by the way in which they are integrating the ability to post verbal comments (a behavior that is common only in virtual spaces) into the physical space. I also appreciate the plans to have people's interaction with the exhibition, and current events, to automatically impact the exhibition itself. This creates a much more dynamic experience that repositions museums as I previously pointed out).
Key Concepts:
- Notion that we should use a collaborative approach to creating a public history.
- Difference between a collaborative storytelling platform that enables people to tell their story to an installation that features small selection of curated stories.
- Need for physical interfaces to be "walk-up" ready - this means that first time users are able to interact with the interface with little difficulty or embarassment.
- Museums should look for ways to extend the experience beyond their walls by giving people something to take with them, such is information in a cell phone.
- Museums re-envisioned as interactive spaces where communities can communicate about important issues and in the process impact the space (installation) itself.
Tuesday, December 1, 2009
Sao Paulo Street Art Experience
I have been a fan of graffiti for a long time. Since the 80’s I’ve been interested in urban culture with a special passion for graffiti. I am in no way an expert in this realm but I have enjoyed taking friends and family on graffiti hunting excursions in every major city that I visit.
I have long taken pride in opening my friends’ eyes to the art that can be found on grimy street corners and dilapidated buildings (not to mention the sewer, though I’ve never toured one of those). Sao Paulo is one of my favorite cities for street art, its graffiti is brimming with colorful excitement and wonderful storylines.
Concept: To share my experience of standing on the streets of Sao Paulo in front long expanses of wall covered with graffiti, I would like to create an outdoor installation in New York that features the sights and sounds of Sao Paulo.
Mechanism: I have not finalized the vision for this project so here is an overview of its initial form and processes.
The source material for the exhibition would be created during my trip to Sao Paulo from late December through mid January. Assets will include pictures that can be stitched together to create continuous renditions of bombed walls, sounds from each location will be recorded to capture the happenings and mood of each locale, and videos of interviews with local residents and artists.
The interviews with residents would focus on their perspective on this art form. The interviews with artists would also encompass an exploration of their inspirations from the streets and other media such as music, video, art, design, etc.
All of these assets would be used to synthesize two separate experiences. The installation would be designed to re-create immersive life-sized experiences of the graffiti. There would be two to four separate locations that could be set in the same space or spread throughout the city. For maximum effect the audience will be surrounded on two sides by video screens projecting specific locations in Sao Paulo.
Each location would feature art and sounds from specific neighborhoods coupled with Brazilian artifacts and delicacies such as street foods, beverages, signage, and even garbage. I would also like to explore enabling the audience to interact with the photos by casting shadows, or by touching the panels to leave imprints and their own “graffiti” on the pictures.
The online experience would feature all of the pictures and sounds from the installation. They would also be able to view the new “graffiti” added to the panels by gallery visitors. Videos that feature the interviews and other behind the scenes content would also be featured online, uploaded through YouTube or another similar service (blip.tv, vimeo, etc).
A short list of ideal locations for this installation idea in New York include: roofdeck of the New Design High School, the lobby of the AIC Center (unlikely unless I take the big screens class), Bar 89, Rooftop Films (summer only).
Why Sao Paulo? I have to come clean and admit what most of you all already know: I am biased towards this city because I am originally from Sao Paulo and my family still lives there. It is also interesting to note that graffiti culture has thrived in Sao Paulo for a long time. Recently graffiti outnumbers outdoor advertisements in this city, since outdoor ads were banned a few years back (within city limits).
Next Steps: To create the my full vision will take several months of planning, however, I would like to do a mini trial run during my trip to Sao Paulo in December. Here is what I got take care of before I take off: enroll my cousin to join me on this project, contact the Choque Cultural gallery in SP to make initial contact, map out neighborhoods to scout for project.
Wednesday, November 25, 2009
Design for Cat Toy Controller - IPC Final Project
This evening I worked on the design of the joystick controller for my cat toy project. I decided to put the laser joystick on the lower left-hand corner, underneath two status lights (the first is power status, the second is laser status), in the center I have placed the joystick for the arm, and the bird call buttons are on the right-hand side. I am still considering switching the location of the bird call buttons and the large joystick. C
Here are my design documents. I plan to start building the controller tomorrow.

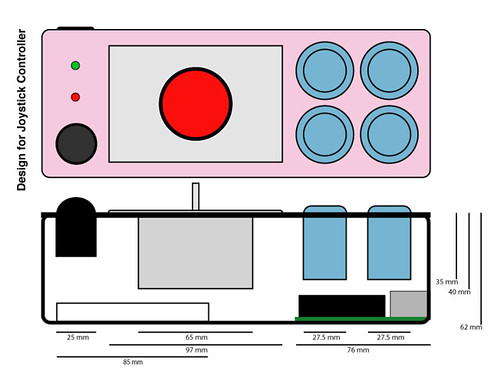
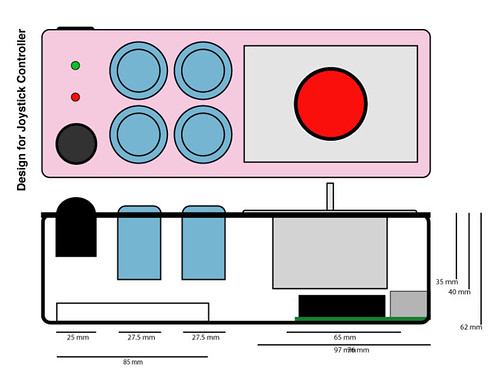
There are still a few things that I need to sort out. First, I need to figure out a solution to hold the thumb joystick in place. Second, I need to find wire that is softer and more pliable than the 22-gauge wire that I am accustomed to using. Last, I need to determine whether the final design will include a solderless or soldered breadboard.
Here are my design documents. I plan to start building the controller tomorrow.
There are still a few things that I need to sort out. First, I need to figure out a solution to hold the thumb joystick in place. Second, I need to find wire that is softer and more pliable than the 22-gauge wire that I am accustomed to using. Last, I need to determine whether the final design will include a solderless or soldered breadboard.
Tuesday, November 24, 2009
LED Sensor Matrix
Concept: Create an LED matrix that uses LEDs for light generation and touch sensing (light sensing actually). This is not a new concept. It is specifically inspired by this tool,which I recently found online.
Mechanisms: LEDs can be used as photodiodes. In other words, they can be used to sense as well as create light. Therefore, it is possible to create an LED-based device that can sense touch indirectly via changes in light (as shown in the example above). It is important to note that LEDs are not as sensitive as photodiodes, and are also less responsive. The sensitivity of LEDs to light varies by the LED color – red is the most sensitive one, blue is the least sensitive one.
The best code sample that I was able to find on this topic was from one of Mike Cook’s Arduino tutorials. Here is a link to this article. The trick to using an LED like a photodiode is to reverse the flow of electricity through the LED. The LED does not allow electricity to flow through it in this direction. That said, it is able to store some of the energy from this current. Then when this current is shut off the energy that was conserved is released into the circuit. The voltage that an LED can store is impacted by the amount of light that hits it.
Earlier today I tested three LEDs as light sensors. I tried using several code samples that I found on the web. However, the only one that worked for me is the one from Mike Cook that I mentioned above. Here is a brief overview of how the circuit and code works, check out Mike’s site for the code itself:
Attach the anode pin of your LEDs to digital pins on your Arduino, attach cathode pin of your LEDs to the analog pins on your Arduino (which are also digital pins 14 through 19). Set the anode pin mode to input and the cathode pin mode to output. Then set the anode pin to low and the cathode pin to high, in order to charge up the LED. Next, change the cathode pin mode to input and take an analog reading, this will be our baseline. After 20 – 40 milliseconds take a second reading, which will give us our final values. Last, switch the cathode mode back to output and set it to low.
Here are some important things to consider when working on a prototype for this device (collected from my readings around the web on this topic):
- Small LEDs are better because they can hold less electricity and discharge faster
- Clear LEDs work better because the light is not filtered through colored plastic
- LEDs can only sense lights from spectrums that have shorter wavelengths
Monome-Inspired Modular Open Source Controllers
As if I haven’t posted enough related to the Monome recently, here is another entry inspired by this awesome little device. My recent fascination with the Monome has led me to wonder why are there no other controllers that share the same open source mindset to creating music coupled with a social and environmental conscious and minimalist esthetic. So here is an idea to fill this void:
Concept: Create modular open source control devices inspired by the Monome. These open source control modules would provide artists with new surfaces and possibilities to interface with their projects. All of the modules would feature minimalistic design, inspired by the Monome, and they would be produced in a socially and environmentally conscious manner.
Mechanics: All modules would work together and share consistent architecture. This architecture would encompass the communication protocol (which would likely be OSC), the chip and firmware selection, and the physical design esthetic and feel. As mentioned above, the hardware and software design would be open-source so that users can contribute new software and hardware hacks and improvements.
At the moment, I envision creating a line featuring several modules for this series: a rotary pot module would featuring 36 (6x6); a sliding pot module would feature 8 (8x1) pots; a force sensitive button module would feature 25 (5x5) buttons; a touchscreen module would feature a 10x10 inch touch surface.
One of my favorite elements of the Monome is that it can be used as a monochrome low-resolution display. Therefore, each module would feature similar display capabilities. In order to achieve this feat we would have to design our own rotary and sliding pots, force sensitive buttons, and touch displays.
Here is an example of an illuminated sliding pot from curious inventor. Unfortunately, these sliders are prohibitively expensive as they cost several hundreds of dollars each. A similar pot could be constructed using a softPot membrane potentiometer coupled with an LED lighting solution that I have not yet found.
Testing the Cat Toy Controller Components - IPC Final Project
Earlier today I received my first shipment from Sparkfun. It contained the joysticks and buttons that I included in my previous post. The motors that I ordered won’t arrive until next week. So I decided to start by testing out the components for my cat toy controller, all of which have arrived.
I started by soldering wires to all the buttons and joysticks. I used my trusty new soldering machine along with an impromptu helping hands device, fashioned out of pieces of a styrofoam-like material. Since I enjoy learning how to solder this was a great opportunity to practice.
After soldering the components I assembled them on a breadboard. This exercise made it clear to me that I will likely need to use both of my Arduinos in this project – one for the toy itself, the other for the controller. I hadn’t given it much thought but originally I had planned to use only one Arduino (I can always consider using a multiplexer). That said, I like how by using two Arduinos it will be easier to add wireless functionality to this toy in the future.
While hooking up the components I discovered that the arcade-like joystick uses switches rather than potentiometers. Therefore, it has a limited resolution that is digital-like, which can only differentiate between nine different orientations; unlike the potentiometer-based joysticks that can differentiate between thousands of precise positions. It was designed for games like pacman, with more limited input requirements. It should work fine for my project (if it doesn’t I have a second thumb joystick as a back-up).
In regards to the other joystick, I noticed after setting it up that Sparkfun sells an inexpensive breakout board. I am considering purchasing this component because it will make it easier for me to mount the joystick in the controller. It also reduces the number of pins to 5 (from 10), which will help me minimize the wiring complexity.
After setting up the circuit I developed a short Arduino sketch that tests each component. This simple application reads input from each button and joysticks and writes their current state to the serial port. I created this sketch mindfully so that it can serve as the foundation for the final code.
Here is a brief overview of the next steps I need to take:
Design the box for the controller
Check connection with infrared sensor
Find cat scratching post that can serve as basis for the toy
Look at gears to move laser and arm
My First Soldering Machine
Ok, I'll begin by owning up to the fact that I am a complete dork. I confirmed this fact when I became excited about having acquired my first ever soldering machine. My excitement was such that it inspired me to write a post on my journal and to take pictures of this new device.
I'll keep this short. As you can see from the pictures, I bought my "Digital Soldering Station" from Radio Shack - model number: 64-053. That said, it is actually manufactured by Madell (therefore, tips and other accessories are only available directly throught the Madell website).
I'll keep this short. As you can see from the pictures, I bought my "Digital Soldering Station" from Radio Shack - model number: 64-053. That said, it is actually manufactured by Madell (therefore, tips and other accessories are only available directly throught the Madell website).
Monday, November 23, 2009
Monome Build
This weekend my monome fever continued as I worked on putting together the monome kit that I recently purchased (link to previous post about monome madness). I spent over six hours soldering numerous components as dictated by the instructions from the monome website. I am happy to report that I made good progress, though I encountered issues when trying to set up the ribbon cable.
All-in-all I soldered 64 miniscule diodes and small LEDs, and several hundred other pins from chips, resistors, and capacitors. This was by far the most soldering I have ever done. I have to admit the experience was somewhat zen like. I have definitely taken my soldering skills to a whole new level. Here are some pictures from the build.
For the most part I did not encounter any issues, aside from the ribbon cable problem mentioned above. The problem is that I broke two connectors in my failed attempts to connect the ribbon cable. Therefore, I need to find two new connectors, and learn how to use them, in order to get my monome to work. I was silly to think that this would be the easiest part of the build process.
In preparation for this project I purchased a soldering machine from Radio Shack. I am really happy with my decision to get this iron - the standard tip was ideal for the type of work I was carrying out, it has a nice fine point. Since it is manufactured by Madell I can easily purchase new tips online.
More updates to come later this week and early next week, after I am able to get some new ribbon cable.
High Score List - Finally Solved
Over the past week I have been grappling with a simple problem: determining how to create a high score list for the Fangs Invader game. This seemingly simple problem gave me a complete mental block that took a week to thaw. I am happy to report that on Friday night I was finally able to solve this problem. Here is a simple sketch that displays the functionality that I created followed by an overview of my solution.
The Architecture
From an application architecture perspective, I decided to do most of the heavy lifting in Processing because I am know it better than PHP. Hence the PHP script only has two functions: (1) saving the high scores to a text file; (2) displaying the high scores from the text file. Processing takes care of the following functions: (1) Determining if current player’s score qualifies him to be added to the high score list; (2) capturing the player’s name, if he has a high score; (3) re-sorting the high score list to include the new score and name.
PHP Script
Two weeks ago I struggled with PHP to create a script that was able to read data from a query string and save that data to a text file, and read data from the same text file and display it appropriately. After much trial and error I successfully put together a short script that is able to accomplish this feat.
I found PHP to be a very temperamental language. I am not used to working with un-typed languages – I am not skilled enough to take advantage of the additional flexibility they provide while I seem to get caught up in many unknown and unexpected quirks and behaviors. Nonetheless, I have not been dissuaded from learning this language and hope to build my skills over the next three semesters.
Processing Sketch
Shortly after I finished the PHP script I started working on the Processing sketch. In no time I had the Processing application reading from and writing to the PHP script. I quickly lost steam when I tackled the sorting of the highscore list. This is not to say that this problem is particularly hard, however, in the road to solving it I encountered a major a blank.
At first the problem seemed simple, I created a short algorithm that seemed to work fine. I was actually very satisfied with myself for having solved this problem so quickly and simply. I had even started to integrate the solution into my fangs game.
So my solution did work fine unless there was more than one entry on the list with the same score. When this occurred the algorithm would select the name of one entry and apply that name to all others with the same score. Another issue was that the logic for the Fangs high score list is reversed - the better scores are the lower scores. Therefore, I needed to create an algorithm that is able to locate the lowest score that is above zero.
This is when I hit into a hard brick wall, head-on. The problem was back and I did not know where to even start. My attempts at writing pseudocode were totally unhelpful at first. My mind was so focused on integrating the functionality into the game and doing other things to the game that it just did not want to deal with this problem anymore.
In retrospect, I see how my initial approaches to this problem were overly complex (I won’t even try to explain it here). At first I had a hard refocusing and “seeing the forest from the trees” so that I could tackle the problem from a different perspective. It took me 6 days to figure out a different approach to solve this problem. Part of this process required that I stop working on this problem for a few days so that my mind could disassociate from it.
Here is a pseudocode-like overview of the solution that I developed for sorting the highs core list. All of the functionality outlined below is encapsulated in the changeList() function that is part of a class called PHPconnect. To support my algorithm I declared three array variables, each one holds eleven variables: a position for each from the current high score list and one position for the current player’s score.
The newLocation array is used to store the new location of each element on the top score list with references to their current location on the scoreList array, which holds the pre-sorted rank of each element on the old top ten list along with the new player’s score, saved in the eleventh position in the array. All elements in the newLocation array are initialized to -1 when the changeList() function is called. This is relevant because the newLocation array plays an important role in processing lists that feature multiple players with the same score.
The tempScore and tempName variables are used to temporarily hold the re-sorted top score and top name lists. At the end of the chageList() function the scoreList and nameList arrays updated by being assigned the values from these temporary arrays.
There are two other variables that play a crucial role in this function: locCounter and locCounter reverse. These two variables are used to determine the new location of each element on the top score list. These variables are incremented each time that a score is found which is lower than the current one being processed. The locCounter variable is used to hold the location of valid scores (any number higher than zero). This variable holds a score’s position from the first location in an array. The locCounterReverse variable is used to hold the location of invalid scores (0’s and -1’s). This variable holds a score’s position from the last location in the array.
Now let’s take a look at the algorithm. An outer loop cycles through 11 times to go through each score in the highscore array. A secondary embedded in the outer loop is used to compare each score with the others on the highscore list. The sketch determines the pre-liminary new location of each highscore list item by counting the number of scores that are greater than the current score.
Once the preliminary location is determined, the next step is to check if the current player’s score is repeated, and if so to adjust its position accordingly. To determine if a player has a repeated score we check the position “locCounter” in the newLocation array. If the position is not available (it is not equal to “-1”) then we loop through subsequent positions, using a while loop, until we find one that is available. This available position is then set as the new position for this list element in the newLocation array.
Once each position in the newLocation array has been assigned, a loop is used to input data into the tempName and tempScore arrays. Then these arrays are used to reset the scoreList and nameList arrays with the updated top score list.
Here is the code for the PHPconnect class that I created:
class PhpConnect {

  // variables that hold the top 10 list of scores. Each is 11 values long to help resorting when a new high score is added
  String [] completeList = new String [11];          // holds the name and score that are read from the file online
  String [] nameList = new String [11];              // holds the name of the players on top 10 list, the 11th spot holds the current player's player
  float [] scoreList = new float [11];               // holds the score of the players on top 10 list, the 11th spot holds the current player's score

  // base list URL
  String baseURL;                                    // holds the base URL that will be used to access the high score file online

  // data associated to current players' performance
  float playerScore;                              // score of current player
  float highScorePos;                             // holds the position of the player in top 10 list, or -1 if player did not reach high score list
  boolean highScore;                              // set to true if player sets a high score
  boolean setCaptureName;                         // set to true when Processing should capture a name from user
  String playerName;                              // holds the current players name (if they have a high score)
  int playerIndex;                                // holds the current letters location within the playerName string
  int nameLength = 6;                                 // holds the length of the name
  boolean ready2save;                             // set to true when Processing sends the new top score list to php application

  int [] newLocation = new int [11];              // holds the new location of each element on the top 10 list


  PhpConnect(String tURL) {
    baseURL = tURL;                               // set base URL to the parameter passed into object
    playerScore = 0;                              // score of current player
    highScorePos = -1;                            // holds the position of the player in top 10 list, or -1 if player did not reach high score list
    highScore = false;                            // set to true if player sets a high score
    setCaptureName = false;                       // holds when Processing should capture a name from user
    playerName = " ";                             // set player name to a space
    playerIndex = 0;                              // initialize the playerIndex variable
    ready2save = false;                           // holds when processing should send the new top score list to php application
  }


void loadList() {
  // create the URL used to make a high score list request
  String loadURL = baseURL + "?type=load";
  // load the top 10 list into the webPageArray (a name and score will be added to each position on the array)
  String [] webPageArray = loadStrings(loadURL);

  // loop each element in the array and breaks it down into separate name and score arrays
  for (int loadLoop = 0; loadLoop < completeList.length-1; loadLoop++) {
    // capture the top 10 elements of the webPageArray variable (in case any garbage is included at the end of the data received)
    completeList[loadLoop] = webPageArray[loadLoop];
    // split each element in the array into a name and score
    String [] tListRecord = split(completeList[loadLoop], ' ');

    // check if the tListRecord array has more than one element before initializing the nameList and scoreList arrays
    if (tListRecord.length > 1) {
      nameList[loadLoop] = tListRecord[0];             // save name to nameList array
      scoreList[loadLoop] = int(tListRecord[1]);       // save score to scoreList array
    }

    // DEBUG Statements
    print("name: ");
    print(nameList[loadLoop]);
    print(" - score: ");
    print(scoreList[loadLoop]);
    println();

  }   // close the for loop
}     // close the function loadList()


// to move the ARRAY count the number of figures that are larger or smaller than the current one
// checks if the current player's scores is in the top 10 and set highScore and setCaptureName to true
void checkList(float tPlayerScore){
  playerScore = tPlayerScore;                  // set player score variable
  setCaptureName = false;                      // initialize setCaptureName variable to false

  // loop through each element in the high score list to compare against current player's score
  for (int checkLoop = completeList.length-1; checkLoop >= 0; checkLoop--) {
    // tell application to capture the player's name if their score is better than the score of the player in the current array position, or if the current position is not set
    if ((playerScore < scoreList[checkLoop] && playerScore > 0) || scoreList[checkLoop] <= 0) {
      // set variable to tell application to capture name
      setCaptureName = true;
    }
  }
}     // close the checkList function


// function that captures the name of the user. The names for the list can be up to 5 characters long
// this function needs to be called from the keyPressed() function in the main sketch
void captureName() {
  // if current player has a high score as set by function checkList() then listen to keys
  if(setCaptureName) {
    // if delete or backspace are pressed
    if((key==char(8) || key==char(127))) {
      // and the location on the string is greater than 0
      if (playerIndex > 0) {
        playerName = playerName.substring(0, (playerName.length()-1));        // cut the last character from the name
        playerIndex--;                                                        // set the current location of the playerIndex
      } else {
       playerIndex = 0;                                                       // don't let current location get below 0
      }
    // if return or enter keys are pressed
    } else if (key==char(10) || key==char(13)) {
      // don't do anything if the playerName variable does not contain information
      if (playerName.equals(" ") || playerName.equals("")){}
      // if the variable contains information then set highScore variable to true to notify application to sort highScore list
      else {
        setCaptureName = false;
        highScore = true;          // set high score to true
        playerIndex = 0;           // re-initialize the location on string to 0
      }
    // if a letter key is pressed then add it to the string
    } else if (key > char(48) && key < char(123)) {
      if (playerIndex == 0) {                          // if playerIndex equals 0 then initiate string
        playerName = str(key);
        playerIndex++;
      } else if (playerIndex < nameLength) {                    // only accept input if character location is lower than 5
        playerIndex++;
        playerName = playerName + str(key);
      }
    }

  print("Capture Name - index number: ");
  print(playerIndex);
  print(" player name: ");
  print(playerName);
  println();
  }

}


// function that re-sorts the top 10 list to include the new player's score
// this function should be called continuously in the draw loop
void changeList() {
  // loop through all of the elements on the list and change the values based on the change rate
  if (highScore) {
      float [] tempScore = new float [11];                                    // temporarily holds re-sorted score list
      String [] tempName = new String [11];                                   // temporarily holds re-sorted name list
      int [] newLocation = { -1, -1, -1, -1, -1, -1, -1, -1, -1, -1, -1};     // holds the location in the current array of each element on the list
      int locCounter = 0;                                                     // temporarily holds a scores new location on the array
      int locCounterReverse = 10;
      scoreList[10] = playerScore;                                            // add current player's score as the last element on the list
      nameList[10] = playerName;                                              // add current player's name as the last element on the list

      // go through each item in the array to determine its new location
      for(int change = 0; change < scoreList.length; change++) {
          locCounter = 0;                                                     // initialize the locCounter variable
          locCounterReverse = 10;
          boolean locFound = false;                                           // declare and initialized the locFound variable

          // compare this item in the array with all other numbers in the array
          for(int subChange = 0; subChange < scoreList.length; subChange++) {
            // if this item in the array is greater than another then add one to locCounter variable
            if (scoreList[change] > scoreList[subChange] && scoreList[subChange] > 0) {
                  locCounter++;
            }
          }

        // loop to adjust the locCounter variable when dealing with scores that are repeated on the list
        // loop through following steps until the location is found
          if (scoreList[change] > 0) {
              while (locFound == false) {
                    // if the location at array index [locCounter] has not been assigned yet then set locFound to true
                    if (newLocation[locCounter] == -1) {
                       locFound = true;
                    // else if the locCounter variable has exceeded the size of the array set locFound to true
                    } else if (locCounter > scoreList.length) {
                       locFound = true;
                    // otherwise add one to the locCounter variable
                    } else {
                       locCounter++;
                    }
              }
              newLocation[locCounter] = change;

          } else {
              while (locFound == false) {
                  if (locCounterReverse <= 0) {
                       locFound = true;
                    // else if the locCounter variable has exceeded the size of the array set locFound to true
                    } else if (newLocation[locCounterReverse] == -1) {
                       locFound = true;
                    // otherwise add one to the locCounter variable
                    } else {
                       locCounterReverse--;
                    }
                }
                newLocation[locCounterReverse] = change;
           }

        // set this spot on the list to the entry at the "change" location on the current array
      }

      // loop to set the new values into the array
      for (int update = 0; update < scoreList.length; update++) {
        tempScore[update] = scoreList[newLocation[update]];
        tempName[update] = nameList[newLocation[update]];
    }

    // set the scoreList and nameList array using the temporary arrays
    scoreList = tempScore;
    nameList = tempName;
    // tell the application that it can save the information to the server
    ready2save = true;
    // re-initialize the highScore variable to false
    highScore = false;
  }
}


// function that saves the new top 10 list to the server
// it should be called contiously in the draw loop
void saveList() {

  if (ready2save) {
    String saveURL = baseURL + "?type=save";

    // loop through all of the 10 elements of the list and add them to the URL
    for (int saveLoop = 0; saveLoop < 10; saveLoop++) {
      saveURL = saveURL + "&name_" + saveLoop + "=" + nameList[saveLoop] + "&score_" + saveLoop + "=" + str(scoreList[saveLoop]);
    }
    // call URL in order to upload new data to php application
    String [] loadStringArray = loadStrings(saveURL);

    // DEBUG: debugging code to view status of application
    print("saveURL: ");
    print(saveURL);
    println();

    // reset all variables to their initial state
    playerName = " ";
    playerScore = 0;
    ready2save = false;
    highScorePos = -1;
  }
}

// function that initializes the scores on the server.
void initHighScores() {
   String initializeURL = baseURL + "?type=save";
   for (int saveLoop = 0; saveLoop < 10; saveLoop++) {
       initializeURL = initializeURL + "&name_" + saveLoop + "=" + " " + "&score_" + saveLoop + "=" + "-1";
    }
    // call URL in order to upload new data to php application
    String [] loadStringArray = loadStrings(initializeURL);
}

}
Wholesome Harry - No Good Very Bad Day
Earlier today I worked with my team to edit and finalize our short movie for Comm Lab class. I am excited to report that Arturo, Eric, Tamar, and I have a finished our short movie – Wholesome Harry No Good Very Bad Day.
We have been working on this project for the past three weeks. During the first week we focused on coming up with an idea, developing a storyline and creating storyboards (regarding this part of the process). On our second week we produced and shot the footage at my wife’s school. Finally, this past week we focused on editing the footage into a short movie.
My focus in this post will be the activities from the past two weeks – the production of the shoot and the editing process.
Producing the Shoot
Once we finished the storyboards and shot list our focus shifted to finding a location, enlisting actors, and getting the on- and off-screen materials for the shoot. We started working right away because we did not know when we would be able to shoot, so we wanted to be ready at a moment’s notice.
The original location that we scouted for our movie was the TV studio on the 12th floor of the Tisch building at NYU. Unfortunately, we were not able to get the studio so we shifted to plan b – using my wife’s classroom at Grace Church School for the shoot. We felt this location was a good choice because a local access TV show for children could easily be filmed in a public school.
The props for the shoot were mostly easy to come by. Arturo has a large selection of costumes from his own performance works. Most of the other props were from ITP (the crew’s equipment) or found on location at the school.
From an equipment perspective, we experienced quite a few challenges. First we arrived at the Equipment Room to find all of the non-HD Panasonic DV cameras with broken firewire connections. As a consequence we used HD cameras instead. This is not a bad thing per se, however, none of us were familiar with these cameras and they had fewer manually controllable features.
Our second challenge occurred during the shoot. The M-Audio recorded that we were using was not working properly. Therefore, we had one less audio source to work with. This could have been a much bigger issue. Fortunately, for the most part we were able to get good audio from the cameras.
Here is our full equipment list – as you can see it is quite long and extremely heavy (the equipment, that is).
Eric and Tamar took the lead on the camera (though we all shot for at least a few minutes). Arturo and I took the lead in front of the camera. Arturo’s experience working with video came in handy. He has a good intuition for capturing small and unique shots that I would not have thought of until the editing phase (when it is too damn late).
Editing the Footage
The day after the shoot Arturo, Tamar and I transferred and logged the footage. We also took this opportunity to set-up a project in Final Cut in preparation for the work ahead of us. Since we had been forced to use the HD camera (and since we had an HD-philiac in our group) we decided to make an HD video.
During the week Arturo and Tamar put together a rough cut of the initial scenes. Then we all met on Sunday to finalize the rough cut and take out sandpaper to smoothen it out. The process of working in Final Cut with Arturo and Eric was great. They are both very knowledgeable about this tool and were eager to provide tips. I am currently working on another project in Final Cut and look forward to applying my new knowledge (soon to be transformed into skills).
Having worked with Final Cut 7 over the past two weeks I am impressed (negatively) at how complex it is to use. I guess I’ve become too accustomed to the ease of use offered by iMovie. The file import process and the difficulties associated to working with movie files with different formats have been quite frustrating. I understand the additional power that Final Cut provides – I am finally starting to be able to take advantage of it. That said, I think this tool could be simplified.
[Regarding Final Cut – I am currently working on a post regarding using Final Cut Pro, I’ll update this blog post with a link once it is ready.]
We have been working on this project for the past three weeks. During the first week we focused on coming up with an idea, developing a storyline and creating storyboards (regarding this part of the process). On our second week we produced and shot the footage at my wife’s school. Finally, this past week we focused on editing the footage into a short movie.
My focus in this post will be the activities from the past two weeks – the production of the shoot and the editing process.
Producing the Shoot
Once we finished the storyboards and shot list our focus shifted to finding a location, enlisting actors, and getting the on- and off-screen materials for the shoot. We started working right away because we did not know when we would be able to shoot, so we wanted to be ready at a moment’s notice.
The original location that we scouted for our movie was the TV studio on the 12th floor of the Tisch building at NYU. Unfortunately, we were not able to get the studio so we shifted to plan b – using my wife’s classroom at Grace Church School for the shoot. We felt this location was a good choice because a local access TV show for children could easily be filmed in a public school.
The props for the shoot were mostly easy to come by. Arturo has a large selection of costumes from his own performance works. Most of the other props were from ITP (the crew’s equipment) or found on location at the school.
From an equipment perspective, we experienced quite a few challenges. First we arrived at the Equipment Room to find all of the non-HD Panasonic DV cameras with broken firewire connections. As a consequence we used HD cameras instead. This is not a bad thing per se, however, none of us were familiar with these cameras and they had fewer manually controllable features.
Our second challenge occurred during the shoot. The M-Audio recorded that we were using was not working properly. Therefore, we had one less audio source to work with. This could have been a much bigger issue. Fortunately, for the most part we were able to get good audio from the cameras.
Here is our full equipment list – as you can see it is quite long and extremely heavy (the equipment, that is).
- 2 cameras (DVX)
- 2 DTE
- Extra battery and/or plug-in for DTE
- 2 firewires
- 2 boom mics
- shock mount
- XLR cables
- 2 tapes
- 1 M-Audio
- 1 bi-directional
- 1 tri-pods
- 1 lighting kit (3 lights, 3 tripods, 2-3 umbrellas, cables)
- Headphone
- Extension chords
Eric and Tamar took the lead on the camera (though we all shot for at least a few minutes). Arturo and I took the lead in front of the camera. Arturo’s experience working with video came in handy. He has a good intuition for capturing small and unique shots that I would not have thought of until the editing phase (when it is too damn late).
Editing the Footage
The day after the shoot Arturo, Tamar and I transferred and logged the footage. We also took this opportunity to set-up a project in Final Cut in preparation for the work ahead of us. Since we had been forced to use the HD camera (and since we had an HD-philiac in our group) we decided to make an HD video.
During the week Arturo and Tamar put together a rough cut of the initial scenes. Then we all met on Sunday to finalize the rough cut and take out sandpaper to smoothen it out. The process of working in Final Cut with Arturo and Eric was great. They are both very knowledgeable about this tool and were eager to provide tips. I am currently working on another project in Final Cut and look forward to applying my new knowledge (soon to be transformed into skills).
Having worked with Final Cut 7 over the past two weeks I am impressed (negatively) at how complex it is to use. I guess I’ve become too accustomed to the ease of use offered by iMovie. The file import process and the difficulties associated to working with movie files with different formats have been quite frustrating. I understand the additional power that Final Cut provides – I am finally starting to be able to take advantage of it. That said, I think this tool could be simplified.
[Regarding Final Cut – I am currently working on a post regarding using Final Cut Pro, I’ll update this blog post with a link once it is ready.]
Friday, November 20, 2009
Energy Games
 Concept: to create games that raise student’s awareness regarding energy usage and provide positive reinforcement for energy conservation practices. it different NYU dorms against one another in a competition where the winning dorm receives special privileges and awards.
Mechanics: Create a database with real time and over time energy consumption that enables students at different dorms to compare their energy usage per square feet. Develop several applications to visualize this data in actionable ways.
Develop visualizations that feature energy usage information and a scoreboard in easy to understand info-graphics. Display this information in common areas of the dorms and make it available on the internet. Provide students with access to tips and resources that enable them to learn how to reduce their energy usage, on a personal and community level.
Use outdoor projections on participating dorms to showcase the standing of each dorm at the end of each phase of the competition. Create events to engage students in a discussion about energy usage.
Credit: This idea was inspired by Josh Clayton’s final project in our Introduction to Computational Media class. The picture is licensed under Creative Commons and was taken by adrileb from flickr.
Thursday, November 19, 2009
Course Selection for Spring Semester
It is hard to believe that it is already time to register for next semester's classes. I have an appointment with my advisor this afternoon to discuss my initial course selection. In preparation for this meeting I selected my 10 course choices, which I have listed below.
The way the process works here at ITP is that each student selects their top 10 course choices. Once all students have received approval on their course requests from their advisors, the process is turned over to an evil or benign algorithm (depending on who you ask). This algorithm determines who gets into which class.
My Top 10 List
- Dataflow Audio Programming
- The Softness of Things
- Nature of Code
- Social Facts: Motivation
- Big Games
- If Products Could Tell Their Stories
- Design Expo
- Spatial Media
- Exhibit Design: NY Hall of Science
- Mechanisms and Things That Move
Building My First Arduino Shield
Yesterday I built my first Arduino shield. I've been wanting to put one of these together for a long time as I am tired of having the disconnect and re-connect wires individually whenever I want to swap my Arduino between projects.
It took me about an hour and half to solder all of the tiny little pieces together. As you can see from the pictures, I did a pretty good job of putting this little sucker together. Well, at least it looks good as I have not tested the shield yet to confirm it is actually working.
This was by far the best soldering practice I've had to date. Very timely considering that I will be working on the Monome build this weekend. Planning on purchasing another one of these soon.
Monome Madness

The initial excitement continued to increase during the past several weeks. It reached a highpoint this week with the recent arrival of the components and the gradual arrival of these devices on the floor. I can’t wait for my build session that is scheduled for Saturday. I will assemble a “40h” unit that is similar to the one described here, though it will feature a different case.
The other factor that has greatly heightened my anticipation for the build was tonight’s visit from the Monome creator, Brian Crabtree. Brian's partner in crime, Kelli Cain, was not able to join this session. Here is a short video from Brian’s visit. I’ve captured part of his talk along with two short demos of the Monome in action.
Learning about the motivation and creative process associated to the design of the device and the production process was inspiring. The product and process are both manifestations of the value and belief systems held by Brian and his partner Kelli Cain. First and foremost, this product was born out of the desire to provide new possibilities for creativity through freedom. That is why it is an open source platform that has no pre-defined functionality.
The designs and prototypes, and later the machinery required to manufacture these devices, were developed with no help from corporate organizations. Equally important, local production partners are used to manufacture the Monome, and selection of these partners has been guided by a socially and environmentally conscious philosophy.
In my opinion Brian and Kelly are true artists. They have brought (and continue to bring) into the world amazing new possibilities on many different dimensions – the product, the process, the freedom, and the passion. That’s enough praise since I know I am starting to sound cheesy (as if I that was not the case already). I'll just reiterate once again - I am officially inspired. I know that many of my future projects will include this little box as a key interface element.
Wednesday, November 18, 2009
Fangs Resurrected - ICM Final Project Idea

Since I last shared it in class, and on this blog, I have made a few updates to this sketch. Namely, I have added functionality to calculate and display a score, which is shown on a new page at the end of the game. This is a very small improvement in comparison to the changes I will integrate over the next two weeks.
For this project there are a bunch of updates that I plan to make. Since I may not be able to implement all of the changes I have created a prioritized list to guide my work over the past several weeks:
- Improve game scoring logic and add score to game play environment.
- Create an online high-score database (or file) using PHP scripting.
- Improve animation by adding wing movement, and making it more natural.
- Develop group behavior for the bats so that they interact and flock occasionally.
- Update look and feel of the game by adding back images and improving design.
- Add multiple stages with increasing levels of difficulty.
[picture taken from flickr user furryscalyman - Creative Commons License ]
Subscribe to:
Posts (Atom)