Here I will evaluate the benefits and drawbacks provided by a jailbroken AppleTV, the effort required to implement these changes, and the impact on user interaction and interface. My perspective will be utterly personal and totally biased. At the end of it all I will also provide short how-to instructions for anyone attempting the same feat – just don’t blame me if anything goes wrong.
The Benefits
I like AppleTV a lot. Out of the box it offers a cool and easy-to-use interface that enables people to access media, including video, audio and images, via a TV. That said, in its “original” state the AppleTV has a lot of limitations as a media hub.
Its biggest shortcoming is that it cannot tap into the wealth of digital content that is available for streaming online. The only web services available natively are YouTube, Flickr and iTunes. As a consequence, users can only access TV shows and films if they are willing to purchase and/or rent them via iTunes; user generated materials is the only content that can be accessed for free vai AppleTV, using YouTube and Flickr.
The ability to expand the amount of content accessible from the internet is the number one benefit of adding applications to AppleTV. Now I can access Hulu, LastFM, NetFlix and numerous other sources for TV shows, movies and long and short-form web videos (note: that I have not been able to get NetFlix to work properly yet).
The Drawbacks
There are drawbacks to jailbreaking your AppleTV. I’ve noticed that the system occasionally becomes unresponsive and needs rebooting. The AppleTV has also had problems synching with iTunes though the movie rental features continues to work fine. I also continue to be able to stream my collection from my desktop through iTunes. One last consideration is that you cannot update the AppleTV OS because newer versions without running the risk of loosing your applications and data that is not backed up.
The Applications
The three most notable applications that have been installed on my device are Boxee, NitoTV and XBMC. All three enable playback of previously unsupported file formats on the AppleTV and support streaming of content from various online sources. These appliances also provide distinct interfaces for file management and audio/video playback. Essentially, they enable users to customize the interface of their AppleTV. Some people prefer to leverage one of these alternative appliances as their primary AppleTV interface. Here is a brief overview regarding each of these appliances (based on my limited experience playing around with them for week’s worth of nights).
Boxee
This is my favorite of all three applications. Boxee is a multiplatform media center (available for the Mac and PC). The first benefit is that it is easy to install. A simple application is available online that enables people to easily create a USB patchsticks – no need to use the terminal interface on your Mac. Before you install this application you should visit Boxee.tv to sign up for a user account, which is required. (note: the screenshots were taken from a post on the AppleTV Hacks blog).

Boxee features a nice interface that is even more streamlined than Apple’s Frontrow. I was able to quickly find and play the content I was looking for with little difficulty. The main navigation is always easily accessible on the left-hand edge of the screen. To access the menu a user simply has to move the selection past the left-hand column of items on the screen (rather then press the menu button). The exception is when the user is watching videos since they are always displayed in fullscreen.
One really interesting feature that Boxee offers (I would call this their killer app) is the social networking capabilities. This feature enables users to share information about the shows that they are watching, and have watched, with their friends. This functionality enables users to easily find relevant video content in a world where the sources for video content will continue to become more fragmented. A good way to think about this functionality is that it turns each one of your friends into a channel. These channels feature content that your friend has viewed, and/or recommended. All of this from the comfort of your couch. No wonder the networks are scared of this application (as evidenced by the fact that the networks pulled Hulu service from Boxee).
For the most part, the main section of the interface leverages two basic layouts for organizing content: (1) a grid layout featuring thumbnails organizes content categories and video content, including channels, playlists, TV shows, or albums; (2) A list-based interfaces is used for file-level content (e.g. songs or specific TV show episodes) and content sorted by attributes such as artist name. This layout will differ between channels, since each channel is customized. Also worth mentioning are some nice subtle touches they’ve added to the interface. The main navigation menu features local time and weather.

Coupled with the well-designed interface, Boxee is set-up to provide access several good “channels”, including Hulu, YouTube and many others. I was expecting to be able to access movies from NetFlix via Boxee. Unfortunately, I have not been successful in this endeavor yet. (Since NetFlix streams to the Xbox 360 they may soon release an update to the XBMC application that can solve this issue).
From a responsiveness perspective, this interface works pretty well. The videos usually take only a minute or so to start, though I did encounter a few videos that took two to three attempts to launch properly. These problems did not have a strong negative impact on my experience considering that I face similar issues with Apple’s Frontrow.

The video quality varies depending on the channel and piece of content you are watching. Some channels featured YouTube quality videos, while others offered TV resolution (I did not find any HD content). When I first launched Boxee I had a screen alignment problem. I’m happy to report that it was very easy to calibrate the screen.
XBMC
The XBMC media center is my least favorite of the three applications. This appliance is also a multiplatform media center, similar to Boxee. The installation process was equally easy (they are actually installed together using a USB patchstick).

The standard interface is based on that of the original Xbox. This appliance even includes a skin that is similar to the Xbox 360 interface. It seems to have been designed with fans of the Xbox in mind. Though the interface is well designed I did not like it as much as Boxee, but I can imagine that Xbox fans will appreciate the familiar surroundings.
Before I go any further in my critique of this interface, it is important to note that XBMC allows users to redesign the interface by creating their own skin. I am not sure to what extend designers are able to change the interaction design of the system.
The main menu on this application is located on a home screen. In this regard it is similar to the Frontrow menu; the difference is that the XBMC menu is only one level deep. Once users select a path from the main menu they reach the secondary pages, have a simple two-column layout. A local menu is available on the thin left-hand column. On the right, content is organized in either a list or a matrix layout. Further layout variations are available to display results when users select an artist, album or TV show.

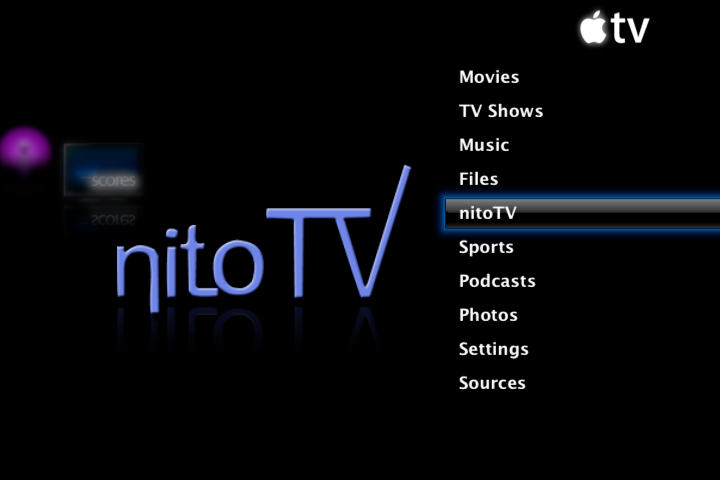
NitoTV
This was the most powerful but hardest to use of all of these appliances. To begin with the installation process was considerably more complex than the other two applications. You need to be willing to use the terminal application to install this appliance on your AppleTV. I don’t mean to scare anyone – it is not a hard but it does require basic knowledge of shell commands.

NitoTV leverages the AppleTV’s standard interface. Therefore, it is a great solution to be for anyone who is used to the native interface available on this device and wants to extend its capabilities. I won’t go into details about Apple’s Frontrow interface since it is so pervasive.
Some elements of the interface are not as clean as Boxee and XBMC. That said, the power of NitoTV is related to the wide range of stuff that it lets you do such as playing classic Nintendo and Sega games, view RSS feeds, and launch other applications. (In the interest of full disclosure, I have not set-up the games or launched any new applications from NitoTV yet).
[link to Nito blog]
How to Free Your AppleTV
Though it took me a long time to figure out how to do this, you should be able to do it in about 30 minutes. Before you get excited about trying this out I must caution you that there are risks involved in this procedure – do it at your own (or your AppleTV’s) risk. I strongly recommend that you back up all of your data. Another important consideration is that you should remove all USB drives from your computer while running to flash creator (I’ll tell you more below). Lastly, make sure you read ALL of the instructions below and the updated instructions on the developer’s website.
So if you are still interested, here is what you will need:
- A USB thumb drive. Note that not all USB can boot an AppleTV so here is list of USB drives that are known to work. http://forum.boxee.tv/archive/index.php/t-1240.html
- AppleTV software version 2.3 or earlier. If you have a newer version of AppleTV than this probably won’t work. As of today version 2.3 is the latest one.
- Broadband internet connection to a network that serves your computer and the AppleTV.
Step 1: download the USB flash drive creator for the Apple TV from this website. This application is by far the best solution that I found - download it here. Other patchstick solutions do exist. You can create your own patchstick using scripts from the awkwardTV website and some basic shell commands. Or you can choose to purchase an easy to follow patchstick solution from a website called patchstick.ca. I tried both of these approaches and neither one worked for me – not even the paid approach. If you know of other solution please leave a comment (I’m sure there are other ones out there).
Step 2: Install software on your Mac
Step 3: Plug USB flash drive into your Mac
Step 4: Launch application.
Step 5: Set installation and options The first steps are easy: just select ATV-Patchstick from the installation list; then from the installation options menu select AppleTV version 2.x, and all tools and applications.
Step 6: Set USB target device This step requires great care. If you choose the wrong USB Target Device you can end up erasing all the contents from one of your USB disk drives. If you don’t know the drive number of your USB flash drive then you should use the Disc Utility application to confirm. Another tactic is to remove all other USB drives during installation.
Step 7: Plug USB flash drive into your AppleTV
Step 8: Install the software on your Apple TV To install the software you need to reboot the apple TV by simultaneously pressing the menu and ‘-‘ buttons. When the AppleTV reboots a linux penguin will appear on the screen. Then notes delivered in terminal-style text will begin to appear. The text informs you when the installation is completed. At this point you need to remove the power chord from your AppleTV, leave it unplugged for 5 seconds, then connect it back up.
Step 9: Install Boxee and XBMC Once the AppleTV reboots and you arrive back at the main menu you will notice that there are a few new options available: “Launcher” and “Software Menu”. Select “Launcher” then “Downloads”. Before you are able to open Boxee or XBMC you need to download the applications via this page, even though they already seem to be available via the menu.
Step 10: Install NitoTV The process for installing NitoTV is a bit more complex because you need to use the terminal on your Mac. You can download the application from this page, then just follow the instructions on the read me file.
No comments:
Post a Comment